")
When SoulCalibur 2 first hit, it was like a revelation to me. At work, all I could think about was my lunch break where I would drive to the nearby mall and pump tokens into the arcade's machine. They had created something called Conquest Mode where you created a profile and a pin number, then chose one of four different kingdoms to fight for. There wasn't any difference in the kingdoms, so you were essentially picking your favorite color out of Red, Blue, Yellow, and I think Green. The more you played, the more skilled your fighter became (My choice was Kilik, naturally), and the system was smart enough to "grade" you after each battle, adjusting your fighter's skills and preferred moves and combos. The reason it did this was, while you were away and other people attacked your kingdom, there was a good chance that one of the defenders would be you. If you win a lot and are very aggressive, your fighter will behave similarly when someone challenged them. Also, the more you won (and played), the higher your rank, up until you were the Defender of the Realm (or something similar) and your fighter showed up, with your name, all the time. It was awesome.
Of course, when your kingdom had completed purging the world of the other three kingdoms, the map, and your saved character, reset and you had to do it all over again. Well played, Namco.
Before I get into the details, here is a little info on Voldo:
Voldo is easily recognizable by his strange and unique style of play. His moveset is based on attacks that bend and twist his body in unnatural ways, making him an extremely unpredictable fighter. He also has many stances that compliment his odd style, like his Mantis Crawl in which he stands on his four limbs face-first. Even his neutral stance has him moonwalking.
Another recognizable feature of Voldo is that he has no spoken dialogues, just grunts and hisses. This is explained in the game's universe because of his isolation in his dead master's tomb, which has led him to lose his sight and become insane, often hearing his master speaking to him in his mind. Later games have hinted that Vercci's voice could be produced by Soul Edge itself, but no official confirmation has been made. Voldo's face is obscured by either tightly bound strips of cloth or a full mask in every game he has appeared in.
Fun fact: I am not allowed to play Voldo, because he creeps my friend Laura out. I am also not allowed to play Maxi, because I beat her by just pounding the Y button.
This photo was taken in the Garfield Park Conservatory's Arid Room. Because desert plants have such unique shapes, I like using them as a backdrop and the sandy soil allows the figure to sink in a little, creating the illusion of weight. It was lit by natural light, and while we were there, a very nice couple stopped and talked to April and I about photography. The wife, trying to stay polite but obviously a little disturbed at a grown man playing with toys, complimented me on photographing my "little creatures".
In Photoshop, I lowered the saturation and then used the lab color tweak to even everything out. I used a gaussian blur to give it that video game bloom effect, and finally, I painted the gem on his Katar. Oh, wait, I lied. Before I did any of that, I had to clone out the HUGE gap between his torso and his waist. I should probably fill that one day...
A tale of swords and EXIF, eternally retold:
| Camera: | Canon EOS Digital Rebel XTi |
| Exposure: | 0.2 sec (1/5) |
| Aperture: | f/5.6 |
| Focal Length: | 55 mm |
| ISO Speed: | 100 |
| Exposure Bias: | 0 EV |
| Flash: | Off |
| File Size: | 3.2 MB |
| File Type: | JPEG |
| MIME Type: | image/jpeg |
| Image Width: | 2592 |
| Image Height: | 3888 |
| Encoding Process: | Baseline DCT, Huffman coding |
| Bits Per Sample: | 8 |
| Color Components: | 3 |
| X-Resolution: | 72 dpi |
| Y-Resolution: | 72 dpi |
| Orientation: | Horizontal (normal) |
| Software: | Adobe Photoshop CS3 Windows |
| Date and Time (Modified): | 2008:12:29 08:58:34 |
| YCbCr Positioning: | Co-sited |
| Exposure Program: | Aperture-priority AE |
| Date and Time (Original): | 2008:12:28 15:59:10-06:00 |
| Date and Time (Digitized): | 2008:12:28 15:59:10 |
| Metering Mode: | Multi-segment |
| Color Space: | sRGB |
| Focal Plane X-Resolution: | 4433.29532497149 dpi |
| Focal Plane Y-Resolution: | 4453.60824742268 dpi |
| Custom Rendered: | Normal |
| Exposure Mode: | Auto |
| White Balance: | Auto |
| Scene Capture Type: | Standard |
| Compression: | JPEG (old-style) |
| Global Angle: | 30 |
| Global Altitude: | 30 |
| Copyright Flag: | False |
| Photoshop Quality: | 12 |
| Photoshop Format: | Optimised |
| Progressive Scans: | 3 Scans |
| XMPToolkit: | Adobe XMP Core 4.1-c036 46.276720, Mon Feb 19 2007 22:40:08 |
| Orientation: | Horizontal (normal) |
| Metadata Date: | 2008:12:29 08:58:34-06:00 |
| Creator Tool: | Adobe Photoshop CS3 Windows |
| Format: | image/jpeg |
| Color Mode: | 3 |
| ICCProfile Name: | sRGB IEC61966-2.1 |
| Viewing Conditions Illuminant Type: | D50 |
| Measurement Observer: | CIE 1931 |
| Measurement Flare: | 0.999% |
| Measurement Illuminant: | D65 |
| Color Transform: | YCbCr |
| Flash Return: | No return detection |
| Flash Mode: | Off |
| Flash Function: | False |
| Flash Red Eye Mode: | False |
Be good,
-Dave
|


Since the weather is still in the low teens outside, I thought I'd take this opportunity to do a fun little tutorial. This one isn't so much about any photographic techniques, but instead I wanted to go into making sets for either your toys or any miniatures you have.
Today (well, last night actually) I built this bit of wall out of things sitting around the house. For this project you will need a few simple things.
Tools:
- Hot Glue Gun
- Acrylic Paints
- Paintbrushes
- Exacto Knife
Materials:
- Popsicle Sticks
- Thick, Sturdy Plastic
- Cardboard
- Little Metal Scrapbook Things*
- Flock
To start, measure out how large you want your wall to be, then cut the plastic to form the base (I used plastic from a toy package) that your wall will stand on. If the plastic is wobbly, use the popsicle sticks to strengthen it.
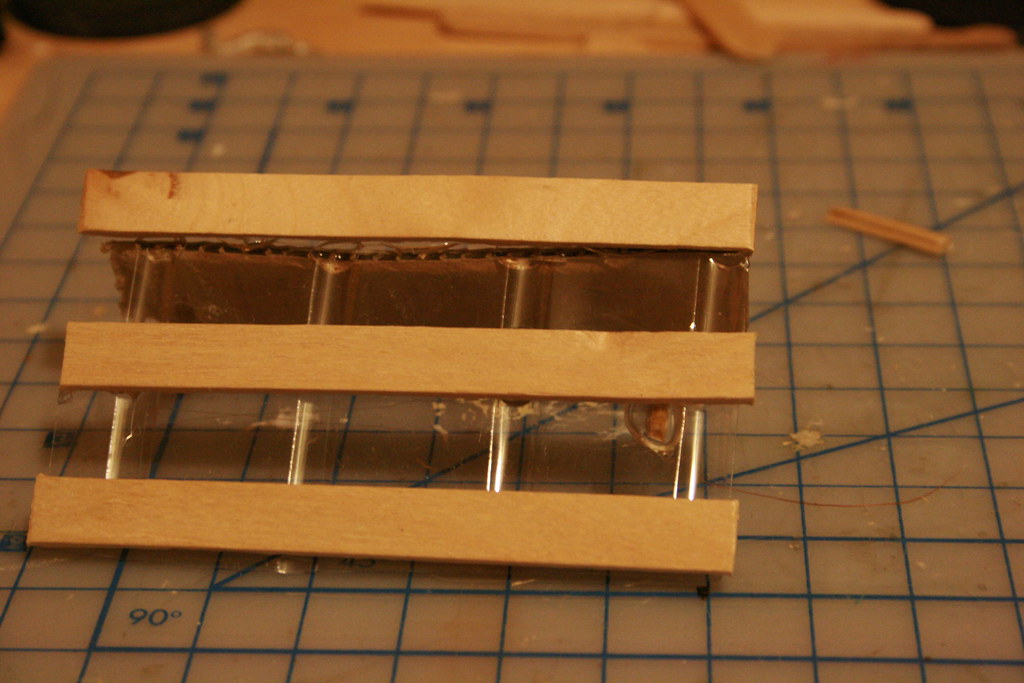
Next, cut the cardboard to make your wall. For this, I used the inside "handle" of a box as it was the right size and the corner was torn, giving it a cool worn look. Cut up another popsicle stick and use the pieces to prop the wall up. Using your exacto knife, make small, even incisions in the cardboard and slide your Little Metal Scrapbook Things inside to make cool rivets.
By now your hot glue gun is heated up and ready to go. Assemble the pieces and glue them together, taking care not to burn your fingers like I often do.
When everything is assembled, it looks something like this.
")
")
")
Before we paint it, I like to give it a coat of primer to help the paint stick. Any can of spraypaint that says Primer will do.
")
")
With paint (I didn't paint the back. Shhh!):
")
Once you get it painted, you'll need to add some flock to the base. What this means is adding some material to help create the illusion of solid ground. Most people use sand, but here I have a mixture of cinnamon, sugar, and red pepper flakes. Normally it isn't a good idea to use organic materials as flock, but I've added a nice thick coat of aerosol sealer to keep anything from rotting.
")
Safety note. Kids, cinnamon and red pepper powder can feel like a near lethal combination when inhaled. Even a little bit is going to really hurt. My nose is still runny!
So now you've assembled, painted, flocked, and sealed your wall. Now what?
PICTURES!
")
")
Be good,
-Dave
*I have been informed by my lovely assistant April that the Little Metal Scrapbook Things are called Brads and can be found in most craft/scrapbooking stores.
|
")
According to Wikipedia, the Arbiter is:
The position of Arbiter is a fictional ceremonial and political rank bestowed upon special Covenant Elites in the Halo video game universe. In Halo 2, the rank is bestowed upon a disgraced Elite commander, as a way to atone for his failures. Although the Arbiter is intended to die serving the High Prophets, he survives both his missions and subsequent betrayal by the Covenant leadership. Learning the Prophets' plans would doom all life in the galaxy to extinction, the Arbiter allies with the Covenant's enemies—humanity—and stops the ringworld Halo from being activated. The character is one of the main protagonists of the Halo universe and a playable character in Halo 2 and its 2007 sequel Halo 3.
Until today I honestly believed that the Arbiter was cursed. I have taken so many pictures of him and every time I get one that I like, something horrible happens. The first was a photo taken at the Chicago Botanic Garden where the Arbiter was wading through a stream, and I loved it. His reflection in the water, the motion of the stream, the way I got him to hold onto a rock, it was perfect. Naturally, the memory card pooped out and I lost it.
This shot is the only other Arbiter photo that I'm happy with and it was one of the pictures I thought were lost when my hard drive failed. Somehow I found a copy on April's computer and the curse was listed!
Unfortunately, due to this photo having been taken and processed over a month ago, I don't remember the details about how I did it. Oh well. I got the shot and that's the most important thing!
Don the ancient armour, and assume the role of EXIF:
| Camera: | Canon EOS Digital Rebel XTi |
| Exposure: | 0.1 sec (1/10) |
| Aperture: | f/5.6 |
| Focal Length: | 45 mm |
| ISO Speed: | 100 |
| Exposure Bias: | 0 EV |
| Flash: | Off |
| File Size: | 3.2 MB |
| File Type: | JPEG |
| MIME Type: | image/jpeg |
| Image Width: | 3888 |
| Image Height: | 2592 |
| Encoding Process: | Baseline DCT, Huffman coding |
| Bits Per Sample: | 8 |
| Color Components: | 3 |
| X-Resolution: | 72 dpi |
| Y-Resolution: | 72 dpi |
| Orientation: | Horizontal (normal) |
| Software: | Adobe Photoshop CS3 Windows |
| Date and Time (Modified): | 2008:12:29 08:59:12 |
| YCbCr Positioning: | Co-sited |
| Exposure Program: | Aperture-priority AE |
| Date and Time (Original): | 2008:12:28 16:00:51-06:00 |
| Date and Time (Digitized): | 2008:12:28 16:00:51 |
| Metering Mode: | Multi-segment |
| Color Space: | sRGB |
| Focal Plane X-Resolution: | 4433.29532497149 dpi |
| Focal Plane Y-Resolution: | 4453.60824742268 dpi |
| Custom Rendered: | Normal |
| Exposure Mode: | Auto |
| White Balance: | Auto |
| Scene Capture Type: | Standard |
| Compression: | JPEG (old-style) |
| Global Angle: | 30 |
| Global Altitude: | 30 |
| Copyright Flag: | False |
| Photoshop Quality: | 12 |
| Photoshop Format: | Optimised |
| Progressive Scans: | 3 Scans |
| XMPToolkit: | Adobe XMP Core 4.1-c036 46.276720, Mon Feb 19 2007 22:40:08 |
| Orientation: | Horizontal (normal) |
| Metadata Date: | 2008:12:29 08:59:12-06:00 |
| Creator Tool: | Adobe Photoshop CS3 Windows |
| Format: | image/jpeg |
| Color Mode: | 3 |
| ICCProfile Name: | sRGB IEC61966-2.1 |
| Document ID: | uuid:0BB6072EB9D5DD1182C1A442B2A7B235 |
| Viewing Conditions Illuminant Type: | D50 |
| Measurement Observer: | CIE 1931 |
| Measurement Flare: | 0.999% |
| Measurement Illuminant: | D65 |
| Color Transform: | YCbCr |
| Flash Return: | No return detection |
| Flash Mode: | Off |
| Flash Function: | False |
| Flash Red Eye Mode: | False |
Be good,
-Dave
|
")
Today was my first chance to get out and take pictures where the temperature was above freezing, so who should I grab... Pyro perhaps? Azrael with his fire swords?
No, I reach for Mr. Freeze and plunk him down in the snow and ice.
Mr. Freeze, real name Dr. Victor Fries (pronounced as Victor "Frees" or "Freeze"), is a DC Comics supervillain, an enemy of Batman. Created by Bob Kane, he first appeared in Batman #121 (February 1959).
Freeze is a scientist who must wear a cryogenic suit in order to survive, and bases his crimes around a "cold" or "ice" theme, complete with a "cold gun" that freezes its targets solid. In the most common variation of his origin story, he is a former cryogenics expert who suffered an industrial accident while attempting to treat his terminally ill wife, Nora.
This could not have been easier. All I had to do was place Mr. Freeze in one of the big piles of snow around our parking lot, angle the camera up to get what little sunlight we have and snap.
Photoshop was equally simple. A quick Auto Levels and Desaturate by -50 and he's done!
With as easy as this was, I kind of feel like I'm cheating.
My name is EXIF. Learn it well. For it's the chilling sound of your doom.
| Camera: | Canon EOS Digital Rebel XTi |
| Exposure: | 1/4000 sec |
| Aperture: | f/4 |
| Focal Length: | 30 mm |
| ISO Speed: | 800 |
| Exposure Bias: | 0/3 EV |
| Flash: | Flash did not fire |
| Orientation: | Horizontal (normal) |
| X-Resolution: | 72 dpi |
| Y-Resolution: | 72 dpi |
| Software: | Adobe Photoshop 7.0 |
| Date and Time: | 2009:01:23 08:48:01 |
| YCbCr Positioning: | Co-Sited |
| Exposure Program: | Aperture priority |
| Date and Time (Original): | 2009:01:23 09:25:08 |
| Date and Time (Digitized): | 2009:01:23 09:25:08 |
| Shutter Speed: | 784190/65536 |
| Metering Mode: | Pattern |
| Color Space: | Uncalibrated |
| Focal Plane X-Resolution: | 4433.295 dpi |
| Focal Plane Y-Resolution: | 4453.608 dpi |
| White Balance: | Manual |
| Compression: | JPEG |
| Image Width: | 3888 pixels |
| Image Height: | 2592 pixels |
Be good,
-Dave
|
")
It's Wednesday and that means it's time for Wage to do his thing. This week, it's bath time for Reflector! Not that he likes it, of course.
As I've mentioned before, we live under an approach lane for O'Hare Airport, so it's a constant struggle to keep everything dusted and our lenses clean. One of the ways I've found helps keep things clean is to use the cleaning pen Wage is holding, another is to keep the lens caps on (who would've thought? Not me), and the third, and perhaps most effective is to pick up a camera bag. For Davemass, April ordered me a Canon camera bag and this thing is a lifesaver. Not only can I carry/store my camera, lenses, filters, batteries, and memory cards, but it still has room left over for toys!
What? Don't look at me like that.
Moving on, let's talk about the setup. All I had to do was balance the cleaning pen in Wage's arms, pose Reflector in anguished humiliation and click. Thanks to one of Chicago's rare sunny days, I didn't need any lights, sparks, or fires.
Going into Photoshop, I have to confess that I wasn't really thrilled with this one. It was flat and kind of boring, so I picked at it, but it wasn't going anywhere. Finally, it stuck me to try and trim this into a Polaroid-type shot, since this looks like so many awkward family moments captured by generations of polariod cameras. Come on, be honest. There are polaroids of most of you in the bath. How I got the look was surprisingly simple. First I duplicated my background layer and ran a Charcoal Filter, with #AC4A23 as my foreground color and #FBE87E as the background. Then I played with the opacity until I was happy with the scratchiness, then, in a new Image, I created a canvas that was a few inches wider and several inches taller than the image I was going to paste in (this is the Polaroid frame). Going back to my original image, I used the Rectangular Marquee Tool to trim my image down to a square, then cut and pasted it into my Polaroid frame. I then duplicated my photo and applied a Plastic Wrap filter and lowered the Opacity until it looked nice. All that was left was to add some shadows around the photo with the Burn tool and we're done!
Not the prettiest or most professional Polaroid imitation, but not bad for a first, blind attempt.
This episode is brought to you by the letters E, X, I, and F:
| Camera: | Canon EOS Digital Rebel XTi |
| Exposure: | 0.167 sec (1/6) |
| Aperture: | f/8 |
| Focal Length: | 50 mm |
| ISO Speed: | 800 |
| Exposure Bias: | 0/3 EV |
| Flash: | Flash did not fire |
| Orientation: | Horizontal (normal) |
| X-Resolution: | 72 dpi |
| Y-Resolution: | 72 dpi |
| Date and Time: | 2009:01:21 12:01:14 |
| YCbCr Positioning: | Co-Sited |
| Exposure Program: | Aperture priority |
| Date and Time (Original): | 2009:01:21 12:43:07 |
| Date and Time (Digitized): | 2009:01:21 12:43:07 |
| Shutter Speed: | 169408/65536 |
| Metering Mode: | Pattern |
| Color Space: | sRGB |
| Focal Plane X-Resolution: | 4433.295 dpi |
| Focal Plane Y-Resolution: | 4453.608 dpi |
| White Balance: | Manual |
| Compression: | JPEG |
| Image Type: | Canon EOS DIGITAL REBEL XTi |
| Owner Name: | ( |
| Camera Serial Number: | 1220842575 |
| Custom Functions: | 24, 0, 256, 512, 768, 1024, 1280, 1536, 1792, 2048, 2304, 2560 |
| Model ID: | 2147484214 |
| Tag::Canon::0x0013: | 0, 159, 7, 112 |
| Lens Type: | EF50mm f/2.5 Compact Macro |
| Internal Serial Number: | H1858035 |
| Tag::Canon::0x0098: | 0, 0, 0, 0 |
| Tag::Canon::0x00AA: | 10, 615, 1024, 1024, 598 |
| Color Space: | 1 |
| Tag::Canon::0x4008: | 129, 129, 129 |
| Tag::Canon::0x4009: | 0, 0, 0 |
| Image Width: | 3888 pixels |
| Image Height: | 2592 pixels |
| Macro Mode: | Normal |
| Image Quality: | Fine |
| Continuous Drive: | Single |
| Focus Mode: | One-shot AF |
| Canon Image Size: | Large |
| Easy Mode: | Manual |
| Contrast: | Normal |
| Saturation: | Normal |
| Metering Mode: | Evaluative |
| Focus Range: | Not Known |
| Canon Exposure Mode: | Aperture-Priority AE |
| Lens Type: | Canon EF 50mm f/2.5 Macro or Sigma 50mm f/2.8 EX or 28mm f/1.8 |
| Lens: | 50mm |
| Max Aperture: | 85 |
| Min Aperture: | 320 |
| Flash Activity: | Flash did not fire |
| Photo Effect: | Off |
| Color Tone: | 0 |
| Focal Type: | Fixed |
| Scaled Focal Length: | 50 |
| Focal Plane Size: | 907 x 605 |
| Flash Guide Number: | 100 |
| ISO: | 800 |
| Measured LV: | 20 |
| Target Aperture: | 16 |
| Target Exposure Time: | 0.15749013123686 |
| White Balance: | Daylight |
| F Number: | 8 |
| Camera Type: | EOS Low-end |
| Auto Rotate: | None |
| Image Width: | 3888 |
| Image Height: | 2592 |
| Image Width (As shot): | 3504 |
| Image Height (As shot): | 2336 |
| Shutter Count: | 63024 |
| Color Temperature: | 5200°K |
| Picture Style: | Portrait |
| Sensor Width: | 3948 (52-3939 used) |
| Sensor Height: | 2622 (23-2614 used) |
Be good,
-Dave
You can order your copy of my book, Life in Plastic, Vol. 1, directly from Lulu: 
|
")
Over on Flicker.com there are groups with a different theme every day. Bokeh Wednesday, Half Naked Thursday, and, I guess most appropriate for today, Macro Mondays. Every Monday a new theme is posted and the group members have a week to come up with an appropriate themed shot. Some past themes have been Imperfection, Urban Decay, and Bodies as Art, but the theme for this week is Metallic, and I knew right away what my shot would be.
Macro Monday, meet Iron Man, Mk 1. Iron Man, Mk 1? Monday. Just in case you two aren't well acquanted, here is a brief introduction, courtesy of Wikipedia:
Born Anthony Edward "Tony" Stark, he suffers a severe heart injury during a kidnapping and is forced to build a destructive weapon. He instead creates a power suit to save his life and help him escape. He later decides to use the suit to protect the world as the superhero, Iron Man. He is a wealthy industrialist and genius inventor who created military weapons and whose metal suit is laden with technological devices that enable him to fight crime. Initially, Iron Man was a vehicle for Stan Lee to explore Cold War themes, particularly the role of American technology and business in the fight against communism. Subsequent re-imaginings of Iron Man have gradually removed the Cold War themes, replacing them with more contemporary concerns such as corporate crime and terrorism.
Throughout most of the comic's history, Iron Man has been a member of the superhero team the Avengers and has been featured in several incarnations of his own various comic book series. The character has been adapted for several animated TV shows, as well as for the 2008 live action films Iron Man and a cameo in The Incredible Hulk where he is played by Robert Downey, Jr.
This Iron Man figure came courtesy of Hasbro, and is/was available at most big box retail outlets. Availability may vary.
Setup for this one was very simple. Taking my repainted and customized (I added the antenna. I R TOY HAXXOR) Mk 1 into my studio aka kitchen stovetop, I had a very difficult time lighting him. I tried a lamp, but he was too washed out. I tried candles, but that wasn't quite right either. Finally, completely out of frustration, I held up my lighter just inbetween the lens and the toy, just below where the camera was focusing and snapped the shot.
For a little post processing love, I first open Mk 1 in GIMP to run their extraordinary Auto White Balance. Say what you want about it's usability and clunky interface (this coming from a Photoshop user), that one tool makes it worth a download. Going from GIMP into Photoshop, I first adjusted the Red Saturation to bring down the ruddy background and make the figure pop more. Then, using the same steps as my robot eyes tutorial, I painted in his Unibeam. Finally, wanting to really make him look like rough, hammered metal, I ran a High Pass Filter over the image, setting the blending mode to Overlay.
So that's my first Macro Monday. It only took me, what, and hour? Hour and a half? I may have to do a couple more of these in the future, if only to see how many themes I can cram my toys into.
TONY STARK BUILT IT IN A CAVE! WITH A BOX OF EXIF:
| Camera: | Canon EOS Digital Rebel XTi |
| Exposure: | 0.5 sec (1/2) |
| Aperture: | f/3.5 |
| Focal Length: | 50 mm |
| ISO Speed: | 400 |
| Exposure Bias: | 0/3 EV |
| Flash: | Flash did not fire |
| Orientation: | Horizontal (normal) |
| X-Resolution: | 72 dpi |
| Y-Resolution: | 72 dpi |
| Software: | Adobe Photoshop 7.0 |
| Date and Time: | 2009:01:19 08:50:21 |
| YCbCr Positioning: | Co-Sited |
| Exposure Program: | Aperture priority |
| Date and Time (Original): | 2009:01:19 08:59:55 |
| Date and Time (Digitized): | 2009:01:19 08:59:55 |
| Shutter Speed: | 65536/65536 |
| Metering Mode: | Pattern |
| Color Space: | Uncalibrated |
| Focal Plane X-Resolution: | 4433.295 dpi |
| Focal Plane Y-Resolution: | 4453.608 dpi |
| White Balance: | Manual |
| Compression: | JPEG |
| Image Width: | 3888 pixels |
| Image Height: | 2592 pixels |
Be good,
-Dave
You can order your copy of my book, Life in Plastic, Vol. 1, directly from Lulu:
|
Captain, the hard drive failure has been contained, and we can resume normal blogging speed.
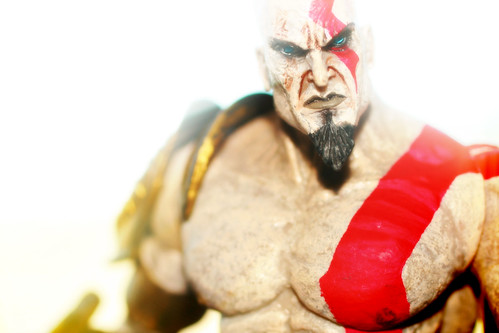
Kratos, according to Wikipedia is:
Kratos is the fictional protagonist of the God of War series. The character first appeared in God of War, released in 2005. In this game, Kratos is on a quest for revenge, a theme continued throughout the God of War series. The series has become a flagship title for the PlayStation brand, appearing on both the PlayStation 2 and PlayStation Portable, with a PlayStation 3 game in development.
This particular figure was made by NECA Toys.
Since I've never actually played God of War, I don't have much more to add (Although if I sell enough books, I could afford a PS2...).
I wanted to try something different with Kratos that built off of what I learned from Jaganatha and using the flash. Placing the figure right in front of the window, I triggered the flash, completely surrounding Kratos in light.
Taking him into Photoshop, I used my lab color tweak to make his colors pop and painted his eyes. Duplicating the layer, I added a radial blur to the background in order to have light spilling over him.
I have to confess, I am really excited about this figure (despite his soft joints) and can't wait for the sub zero temperatures to subside so I can get out and take more shots!
THIS! IS! EXIF!
| Camera: | Canon EOS Digital Rebel XTi |
| Exposure: | 0.005 sec (1/200) |
| Aperture: | f/5 |
| Focal Length: | 50 mm |
| ISO Speed: | 200 |
| Exposure Bias: | 0/3 EV |
| Flash: | Flash fired |
| Orientation: | Horizontal (normal) |
| X-Resolution: | 72 dpi |
| Y-Resolution: | 72 dpi |
| Software: | Adobe Photoshop CS3 Windows |
| Date and Time: | 2009:01:16 12:47:26 |
| YCbCr Positioning: | Co-Sited |
| Exposure Program: | Aperture priority |
| Date and Time (Original): | 2009:01:16 12:56:05 |
| Date and Time (Digitized): | 2009:01:16 12:56:05 |
| Shutter Speed: | 500948/65536 |
| Metering Mode: | Pattern |
| Color Space: | sRGB |
| Focal Plane X-Resolution: | 4433.295 dpi |
| Focal Plane Y-Resolution: | 4453.608 dpi |
| White Balance: | Manual |
| Compression: | JPEG |
| Image Width: | 3888 pixels |
| Image Height: | 2592 pixels |
Be good,
-Dave
|
7:46 AM by
El Dave
, under
Sorry folks, nothing new today because I'm trying to recover from a hard drive crash that wiped out all of the photos I had as a buffer (not to mention all my other files).
Please excuse me while I get some new shots lined up and get back to regular blogging on Friday.
|
6:28 AM by
El Dave
, under
book
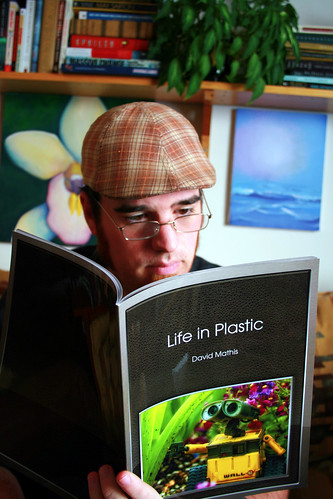
It! Is! Done!
Life in Plastic, Vol. 1 is the culmination of three years of work, from the first decision to take pictures of my toys up until the very end of 2008. Featuring over seventy full color photographs on beautiful glossy paper, Life in Plastic is 41 pages of 8.5" x 11" photobook goodness.
With a foreward by David "Man of 1,000 Podcasts" Price, it is everything I hoped for and then some. All this for just $35!
You can order directly from Lulu by clicking here:
There is also a link over in the sidebar that will take you to the Lulu store.
Please allow 1-2 weeks for delivery, due to the nature of print on demand publishing. You order the book and they print it special for you, then it arrives on your doorstep! Now, because I have had requests for personalized copies, you can email me directly: david . mathis [at] gmail . com and I will put in the order for you, personalize it, then ship it.
(I have a book)
(still can't believe it)
Be good,
-Dave
|
")
Taking a quick step back from the usual today and trying something different. Just as a fun experiment, I wanted to see if I could take photos like some of my friends, and today I'm trying to imitate Jaganatha.
First a little info about Marcus Fenix, courtesy of Wikipedia:
Marcus Fenix (voiced by John Di Maggio) is the main protagonist of the series. He is first introduced as an inmate, serving a prison sentence for abandoning his military post in order to make a vain attempt to save his father, Adam Fenix. Prior to the Locust Invasion, Fenix is noted for having a famed military career, during which he played a notable part in the Pendulum Wars. Despite this, Fenix is left for dead in a dilapidated penitentiary, until Dominic "Dom" Santiago, his friend and former comrade, saves him in the first act of Gears of War. After being freed from prison, Fenix is immediately reinstated into the military and is assigned to serve with Delta Squad. He is later promoted to sergeant and becomes commander of Delta squad shortly after their previous squad commander, Lieutenant Kim, is killed by General RAAM. Fenix leads his comrades across the ruins of Sera, in an attempt to activate the light mass bomb against the Locust. One of the goals when being designed by Epic games was to be an "intelligent bad-ass", to summarize the style of the game at one glance.
Fenix, along with the other Gears of War figures, is made by NECA Toys.
What drew me to Jaganatha's work was his pop portrait style. Funky angles and swirling lights made it really look like he was hanging out with these figures. A drunken Cobra Commander complaining about the Joes; an awkwardly stoic Galactus standing by the wall because he lacks the social graces to mingle. The one recurring thing that he does so well is his use of the flash, and that's what I've attempted to do here. This is probably the first time I've used the flash on my camera and I'm pretty sure the first flash send a cloud of dust into the air.
Setup for this consisted of getting Fenix to stand still with his chainsaw gun raised and use the flash. Taking him into Photoshop, I added the blue glow on his gun and shoulders (with a little blurring for the shoulder lights), then played with the RAW white balance, setting it to Flash for that great orangey, red light. All in all, not too technically difficult, but amazingly frustrating to capture as much soul as Jaganatha does.
It's funny because EXIF works for Bungie:
| Camera: | Canon EOS Digital Rebel XTi |
| Exposure: | 13 sec (13) |
| Aperture: | f/5.6 |
| Focal Length: | 55 mm |
| ISO Speed: | 100 |
| Exposure Bias: | 0/3 EV |
| Flash: | Flash fired |
| Orientation: | Horizontal (normal) |
| X-Resolution: | 72 dpi |
| Y-Resolution: | 72 dpi |
| Software: | Adobe Photoshop 7.0 |
| Date and Time: | 2009:01:09 08:17:26 |
| YCbCr Positioning: | Co-Sited |
| Exposure Program: | Manual |
| Date and Time (Original): | 2009:01:01 21:18:31 |
| Date and Time (Digitized): | 2009:01:01 21:18:31 |
| Shutter Speed: | -242512/65536 |
| Metering Mode: | Pattern |
| Color Space: | sRGB |
| Focal Plane X-Resolution: | 4433.295 dpi |
| Focal Plane Y-Resolution: | 4453.608 dpi |
| Exposure Mode: | Manual |
| White Balance: | Manual |
| Compression: | JPEG |
| XMP Date and Time (Original): | 2009-01-01T21:18:31-06:00 |
| Image Width: | 3888 pixels |
| Image Height: | 2592 pixels |
Be good,
-Dave
|
")
Welcome to the Future! I am well rested (and a year older) after the Davemass Festivities, and we have lots to talk about today, so let's get right into it.
1) Where is the book, Dave? You promised us a book.
-- The proof copy has left the printers and, as soon as I get to look over it, I'll be posting the link here and there will also be a link in the sidebar. It is titled Life in Plastic and weighs in at 41 pages, with almost 80 photos printed on 8 1/2 x 11" full color paper. You can get all that (plus a foreward by the ever-talented David Price himself) for just $35!
I am more than a little excited.
2) New Years Resolution #1
-- Now that the book is coming and the blog is getting some consistent traffic, I would like to be a little more active in finding some work as a photographer. I think my work is solid enough technically and exciting enough to help move some toys. For this resolution, I will also be enlisting you, dear reader. If you know someone who makes toys that would be interested in having my kind of photos for advertisements/flyers/whatever, please direct them here! I also plan on using venues like Wizard World Chicago to get in touch with toy companies, where I can bring a copy of the book with me and show off a little.
3) New Years Resolution #2
-- Another goal I have for this year is to double the average number of pageviews I have here. Google Adsense may not pay much right now, but having twice as many hits means twice the payout, and every little bit helps. Besides, the more money I make on adsense, the more toys I can buy! To accomplish this one, I want to introduce a few new things here on the blog. The Wall-E Tutorial has been incredibly popular and I think some step-by-step guides on the basics of photography might be helpful. Thinks like explaining what the different modes are, setting up your shots, the rule of thirds, etc.
4) New Years Resolution #3
-- Build a storefront on Artfire (you can see the link on the sidebar) where I can sell prints of my photos. I used to have an Etsy shop, but I never really pushed it and it fell into obscurity. The few photos I do have on Artfire get good traffic, and I just need to stay focused and keep working on it.
5) Wage's New Years Resolution
-- Be naked more often.
For auld lang synEXIF:
| Camera: | Canon EOS Digital Rebel XTi |
| Exposure: | 0.2 sec (1/5) |
| Aperture: | f/5.6 |
| Focal Length: | 42 mm |
| ISO Speed: | 100 |
| Exposure Bias: | 0/3 EV |
| Flash: | Flash did not fire |
| Orientation: | Horizontal (normal) |
| X-Resolution: | 72 dpi |
| Y-Resolution: | 72 dpi |
| Software: | Adobe Photoshop CS3 Windows |
| Date and Time: | 2008:12:29 08:55:13 |
| YCbCr Positioning: | Co-Sited |
| Exposure Program: | Aperture priority |
| Date and Time (Original): | 2008:12:28 15:36:13 |
| Date and Time (Digitized): | 2008:12:28 15:36:13 |
| Shutter Speed: | 152170/65536 |
| Metering Mode: | Pattern |
| Color Space: | sRGB |
| Focal Plane X-Resolution: | 4433.295 dpi |
| Focal Plane Y-Resolution: | 4453.608 dpi |
| Compression: | JPEG |
| Image Width: | 3888 pixels |
| Image Height: | 2592 pixels |
Be good,
-Dave
|
")
")
")
")
")
")
")
")
")

