
Aaaand with that, I would like to wish you and yours Happy Holidays and all the best in the new year. Wage and myself are going to be taking two weeks off for the annual Davemas celebrations and will return with more pictures (and hopefully a new book!) on January 7th.
Stay warm, stay safe, and we'll see you next year!
I'm dreaming of a EXIF Christmas:
| Camera: | Canon EOS Digital Rebel XTi |
| Exposure: | 0.167 sec (1/6) |
| Aperture: | f/4.5 |
| Focal Length: | 35 mm |
| ISO Speed: | 800 |
| Exposure Bias: | 0/3 EV |
| Flash: | Flash did not fire |
| Orientation: | Horizontal (normal) |
| X-Resolution: | 240 dpi |
| Y-Resolution: | 240 dpi |
| Software: | Adobe Photoshop CS3 Windows |
| Date and Time: | 2008:12:24 11:48:46 |
| Exposure Program: | Normal |
| Date and Time (Original): | 2008:12:24 12:39:28 |
| Date and Time (Digitized): | 2008:12:24 12:39:28 |
| Shutter Speed: | 2584963/1000000 |
| Maximum Lens Aperture: | 4/1 |
| Metering Mode: | Pattern |
| Color Space: | sRGB |
| Focal Plane X-Resolution: | 4433.295 dpi |
| Focal Plane Y-Resolution: | 4453.608 dpi |
| White Balance: | Manual |
| Compression: | JPEG |
| Image Width: | 2592 pixels |
| Image Height: | 3232 pixels |
Be good,
-Dave
|


Today's update is going to be a bit different today, because I have two, count them two big announcements!
Announcement the First: I am going to be taking a short break over the holidays, from Christmas until after my birthday (Jan. 5th). Wednesday's Plastic 52 will be the last update this year and the Plastic 52 on January 7th will be my triumphant return to the blogospheres.
Announcement the Second: During my break, I will be hard at work getting my first book published! I received a great Foreword by a good friend of mine and will be publishing through Lulu.com. Expect a formal announcement once everything is all put together and I hear back from the publisher.
I hope everyone enjoys their holidays and I will see you...in the future!
For auld EXIF syne:
| Camera: | Canon EOS Digital Rebel XTi |
| Exposure: | 0.003 sec (1/320) |
| Aperture: | f/9 |
| Focal Length: | 30 mm |
| ISO Speed: | 400 |
| Exposure Bias: | 0/3 EV |
| Flash: | Flash did not fire |
| Orientation: | Horizontal (normal) |
| X-Resolution: | 72 dpi |
| Y-Resolution: | 72 dpi |
| Software: | Adobe Photoshop 7.0 |
| Date and Time: | 2008:12:06 13:20:36 |
| YCbCr Positioning: | Co-Sited |
| Exposure Program: | Aperture priority |
| Date and Time (Original): | 2008:12:03 12:48:49 |
| Date and Time (Digitized): | 2008:12:03 12:48:49 |
| Shutter Speed: | 545386/65536 |
| Metering Mode: | Pattern |
| Color Space: | Uncalibrated |
| Focal Plane X-Resolution: | 4433.295 dpi |
| Focal Plane Y-Resolution: | 4453.608 dpi |
| Compression: | JPEG |
| Image Width: | 2592 pixels |
| Image Height: | 3888 pixels |
Be good,
-Dave
|


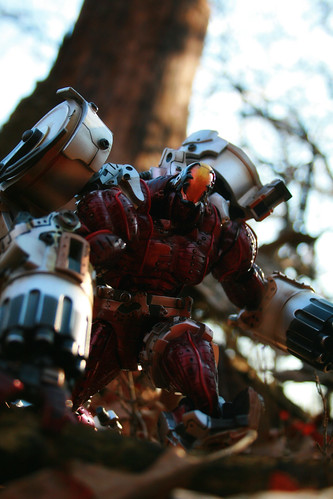
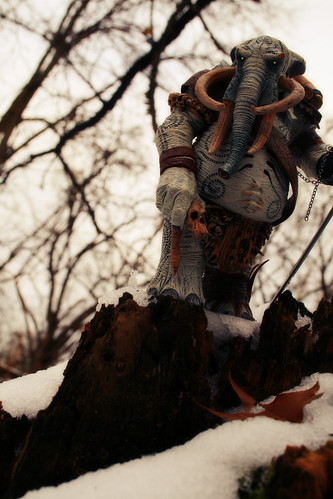
Have you ever seen a figure that you knew nothing about, but knew you had to have?
Enter: Monev the Gale.
From Wikipedia:
Voiced by: Masuo Amada (Japanese), Peter Spellos (English)
Monev the Gale is the first Gung-Ho Gun to fight Vash. Knives locks him in a cell to train his body for twenty years in order to gain the skill and power required to kill Vash. He wears a powered battle suit and carries two high-powered chain guns on his arms. These guns fire extremely fast due to the pressure chambers located on his back, and have tremendous stopping power, enough to tear through entire buildings. He also carries a wide variety of weapons in a big cloth rucksack, including an enormous minigun, powerful enough to punch through a bank vault. He is defeated by Vash and killed afterward as punishment. His life is spared in the anime, but is then killed by E.G. Mine along with Dominique due to his failure.
While I have never read the manga (I hear it is excellent), I have seen parts of the cartoon, and am familiar enough with Vash the Stampede and the other main characters in Trigun. Monev was actually given to me by my buddy Sid, because I kept hassling him about never opening his toys, especially awesome ones like Monev. Thinking it would get me off his back, Sid handed me the figure, telling me to go take pictures or something and leave him alone.
Clearly I am well regarded within my social circle.
Monev was shot in the forest preserve, in a blatant imitation of this photo by my friend Dr. Beef. Go check her stuff out; it's so much fun!
Photoshopping consisted of Auto Levels and a Lab Color tweak to make the little details pop. I really think I'm getting spoiled with this Lab Color thing. Take the picture, run the action, Save As... and I'm done! Can you imagine how short these blog entries would be if all I had to do was post a Wikipedia link and the picture?
Not that this is much better, mind.
Peace and EXIF!
| Camera: | Canon EOS Digital Rebel XTi |
| Exposure: | 0.003 sec (1/400) |
| Aperture: | f/4 |
| Focal Length: | 27 mm |
| ISO Speed: | 400 |
| Exposure Bias: | 0/3 EV |
| Flash: | Flash did not fire |
| Orientation: | Horizontal (normal) |
| X-Resolution: | 72 dpi |
| Y-Resolution: | 72 dpi |
| Software: | Adobe Photoshop 7.0 |
| Date and Time: | 2008:12:01 13:30:02 |
| YCbCr Positioning: | Co-Sited |
| Exposure Program: | Aperture priority |
| Date and Time (Original): | 2008:11:27 11:54:54 |
| Date and Time (Digitized): | 2008:11:27 11:54:54 |
| Shutter Speed: | 566484/65536 |
| Metering Mode: | Pattern |
| Color Space: | Uncalibrated |
| Focal Plane X-Resolution: | 4433.295 dpi |
| Focal Plane Y-Resolution: | 4453.608 dpi |
| Compression: | JPEG |
| Image Width: | 2592 pixels |
| Image Height: | 3888 pixels |
Be good,
Dave
|


6:15 PM by
El Dave
, under

Thanks to the holidays, I've been baking like mad and our kitchen looks like a tornado went through. Wage asked to take some of the pressure off of me and took over the baking of some Lemon Shortbread cookies. While I am grateful for the help, it would have been nice of him to leave me some!
I mean, just one would've been nice.
I actually had to make a second recipe, because I forgot to take pictures the first time around. Because Wage wasn't there to help with the first thing I baked, it turned out terrible, but these cookies turned out fantastic! Or so I'm told.
2 cups EXIF powder:
| Camera: | Canon EOS Digital Rebel XTi |
| Exposure: | 0.067 sec (1/15) |
| Aperture: | f/5.6 |
| Focal Length: | 49 mm |
| ISO Speed: | 800 |
| Exposure Bias: | 0/3 EV |
| Flash: | Flash did not fire |
| Orientation: | Horizontal (normal) |
| X-Resolution: | 72 dpi |
| Y-Resolution: | 72 dpi |
| Software: | Adobe Photoshop 7.0 |
| Date and Time: | 2008:12:17 07:49:46 |
| YCbCr Positioning: | Co-Sited |
| Exposure Program: | Normal |
| Date and Time (Original): | 2008:12:15 21:01:39 |
| Date and Time (Digitized): | 2008:12:15 21:01:39 |
| Shutter Speed: | 256042/65536 |
| Metering Mode: | Pattern |
| Color Space: | Uncalibrated |
| Focal Plane X-Resolution: | 4433.295 dpi |
| Focal Plane Y-Resolution: | 4453.608 dpi |
| Compression: | JPEG |
| Image Width: | 2592 pixels |
| Image Height: | 3888 pixels |
Be good,
-Dave
|


5:11 AM by
El Dave
, under
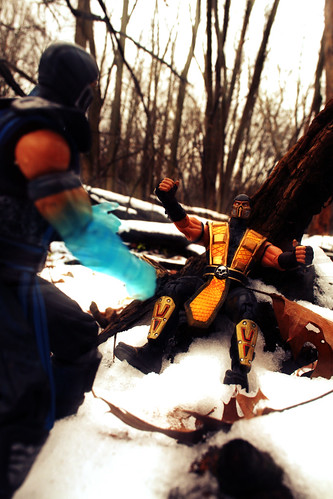
I wasn't expecting much when I bought these Mortal Kombat figures. I have the Kung Lau toy, which is nice, but it's nothing really special. Something about these ninjas makes me really happy, and they're so much fun to shoot!
Brief info RE: Mortal Kombat:
Mortal Kombat is a best-selling series of fighting games created by Ed Boon and John Tobias. Mortal Kombat began as a series of arcade games, which were picked up by Acclaim Entertainment for the home console versions. Now Midway Games exclusively creates home versions of Mortal Kombat. It is especially noted for its digitized sprites (which differentiated it from its contemporaries' hand-drawn sprites), and its high levels of blood and gore, including, most notably, its graphic fatalities—finishing moves, requiring a sequence of buttons to perform, which, in part, led to the creation of the ESRB. The series itself is also known for replacing the hard c sound with the letter K, thus deliberately misspelling the word "combat," as well as other words with the hard c sound (example: "klose" quarters instead of "close" quarters).
In the spirit of Mortal Kombat, I will be using K's instead of hard C's for the rest of this post.
Sub Zero is my default favorite karacter, having the easiest moves and the easiest initial fatality. Plus, I'm always interested in water/ice based karacters. Skorpion, being Sub Zero's nemesis, bekame my nemesis as well. Heading out to the forest preserve, I had to pik a day when it was above freezing to keep my kamera from being frozen solid. I found some small stiks and twigs that were skaled just righ- You know what? No more K's.
The most important thing about shooting outdoors is to find a backdrop that works with the size of your toys and doesn't pull the viewer away and remind them that they're looking at a toy. The goal is always to make the scene as realistic as possible; in this case, Sub Zero and Scorpion are in the middle of a fight, with Scorpion being slammed into a tree.
Processing in Photoshop got started with a Lab Color treatment, then a series of radial blurs centered on Scorpion to draw the eye in and create the illusion of motion. If fight scenes weren't so difficult to pull off, I'd be tempted to do this all the time.
Sub Zero wins...EXIFity:
| Camera: | Canon EOS Digital Rebel XTi |
| Exposure: | 0.008 sec (1/125) |
| Aperture: | f/9 |
| Focal Length: | 24 mm |
| ISO Speed: | 400 |
| Exposure Bias: | 0/3 EV |
| Flash: | Flash did not fire |
| Orientation: | Horizontal (normal) |
| X-Resolution: | 72 dpi |
| Y-Resolution: | 72 dpi |
| Software: | Adobe Photoshop 7.0 |
| Date and Time: | 2008:12:06 13:21:59 |
| YCbCr Positioning: | Co-Sited |
| Exposure Program: | Aperture priority |
| Date and Time (Original): | 2008:12:03 12:50:42 |
| Date and Time (Digitized): | 2008:12:03 12:50:42 |
| Shutter Speed: | 456510/65536 |
| Metering Mode: | Pattern |
| Color Space: | Uncalibrated |
| Focal Plane X-Resolution: | 4433.295 dpi |
| Focal Plane Y-Resolution: | 4453.608 dpi |
| Compression: | JPEG |
| Image Width: | 2592 pixels |
| Image Height: | 3888 pixels |
Be good,
-Dave
|


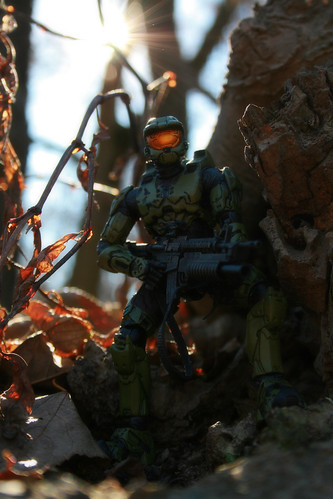
Today we have the follow up to the previous Master Chief shot. Again taken in the wonderful forest preserve, this time Master Chief found himself surrounded by fall vegetation. I like this one a little more because it seems to be telling more of a story than the previous shot. The colors are a little more vibrant, the figure seems to be in motion, and I always love catching the sun rays like that.
Cleanup in Photoshop consisted of the Lab Color adjustment, tweak the levels a bit to brighten the whole thing up, and adding a gaussian blur for that in-game bloom effect.
Since this is just a follow up to the previous post, I think I'm all done with this one! Woo hoo!
I love the smell of EXIF in the morning:
| Camera: | Canon EOS Digital Rebel XTi |
| Exposure: | 0.004 sec (1/250) |
| Aperture: | f/5.6 |
| Focal Length: | 39 mm |
| ISO Speed: | 400 |
| Exposure Bias: | 0/3 EV |
| Flash: | Flash did not fire |
| Orientation: | Horizontal (normal) |
| X-Resolution: | 72 dpi |
| Y-Resolution: | 72 dpi |
| Software: | Adobe Photoshop 7.0 |
| Date and Time: | 2008:12:01 12:54:00 |
| YCbCr Positioning: | Co-Sited |
| Exposure Program: | Aperture priority |
| Date and Time (Original): | 2008:11:28 13:24:13 |
| Date and Time (Digitized): | 2008:11:28 13:24:13 |
| Shutter Speed: | 522046/65536 |
| Metering Mode: | Pattern |
| Color Space: | Uncalibrated |
| Focal Plane X-Resolution: | 4433.295 dpi |
| Focal Plane Y-Resolution: | 4453.608 dpi |
| Compression: | JPEG |
| Image Width: | 2592 pixels |
| Image Height: | 3888 pixels |
Be good,
-Dave
|


5:08 AM by
El Dave
, under

One thing I will say about Wage, he is a fancy pants. He only drinks (what he thinks is) the finest sparkling water, eats imported food (imported from the grocery store), and wears a silken (aka cotton) apron. So it comes as no surprise that, while visiting the Chicago Botanic Garden, he should enjoy these fluffy plants so much. He thinks they're where feather boas come from, and, as much as I tried to explain otherwise, he could not be persuaded. Fancy McWagepants, indeed.
This one was taken, as I said, at the Chicago Botanic Garden, nestled between the feathery seedpods of a prairie plant I can't remember.
Cleanup in Photoshop was about as simple as it gets. Throw a gaussian blur over the whole thing for the soft edges, tweak the saturation a little bit, then flatten and Save As.
Sorry for the light update today, but I feel terrible, it's too early, and I'm going back to bed.
Fancy McEXIFpants, indeed:
| Camera: | Canon EOS Digital Rebel XTi |
| Exposure: | 0.005 sec (1/200) |
| Aperture: | f/5.6 |
| Focal Length: | 55 mm |
| ISO Speed: | 400 |
| Exposure Bias: | 0/3 EV |
| Flash: | Flash did not fire |
| Orientation: | Horizontal (normal) |
| X-Resolution: | 72 dpi |
| Y-Resolution: | 72 dpi |
| Software: | Adobe Photoshop CS3 Windows |
| Date and Time: | 2008:11:17 14:06:54 |
| YCbCr Positioning: | Co-Sited |
| Exposure Program: | Aperture priority |
| Date and Time (Original): | 2008:11:02 14:51:07 |
| Date and Time (Digitized): | 2008:11:02 14:51:07 |
| Shutter Speed: | 500948/65536 |
| Metering Mode: | Pattern |
| Color Space: | sRGB |
| Focal Plane X-Resolution: | 4433.295 dpi |
| Focal Plane Y-Resolution: | 4453.608 dpi |
| White Balance: | Manual |
| Compression: | JPEG |
| Image Width: | 3888 pixels |
| Image Height: | 2592 pixels |
Be good,
-Dave
|


I've had a few people ask how I do the eye glow on my robots, so I thought it would be fun to do a tutorial and share it with you guys. For this we're gonna need 2 things, a picture of a robot and Photoshop. Wall-E? Check. Photoshop? Check.
(click on the pictures to see a larger version)
Step 1) Open your photo and make any Levels or Curves tweaks you need. I left both of those alone for this one.
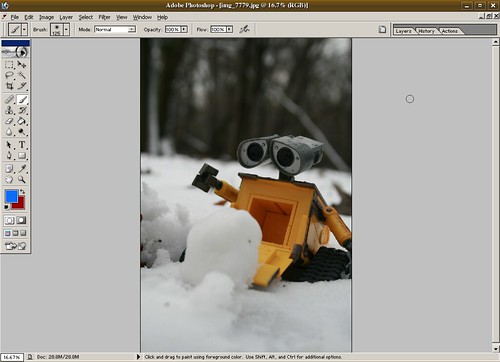
Step 2) OPTIONAL Apply the Lab Coloring that I talked about here. I set the second layer to Soft Light and changed the Opacity to 30%. Because I'm using it so much, I've recorded the Lab Coloring as an Action, so all I have to do is Open the image, click on Actions, then push Play. Like I said, this step is completely optional, but I want to show my work (wouldn't my algebra teachers be proud...).
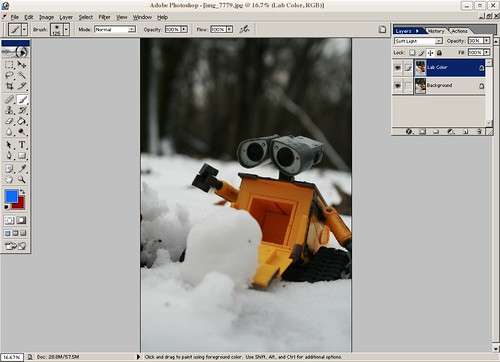
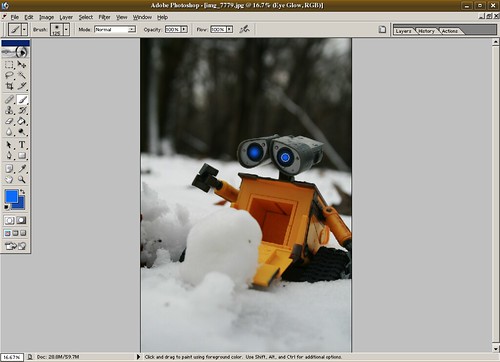
Step 3) Create a new Layer between the two existing Layers and call it Eye Glow. Select a soft edged paint brush and decide what color you want the eyes to be.
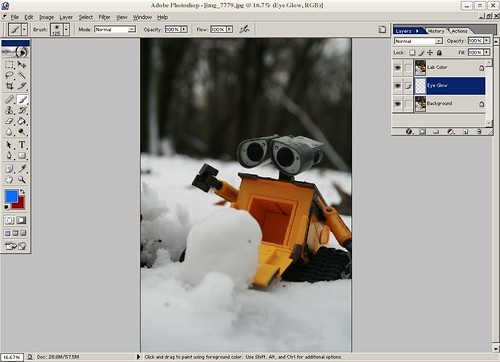
Step 4) Pick two shades of whatever color you chose for the eyes. Since Wall-E has blue eyes, I picked a dark blue and a brighter, almost turquoise. Paint the dark color first, using a brush just smaller than the area you're trying to fill.
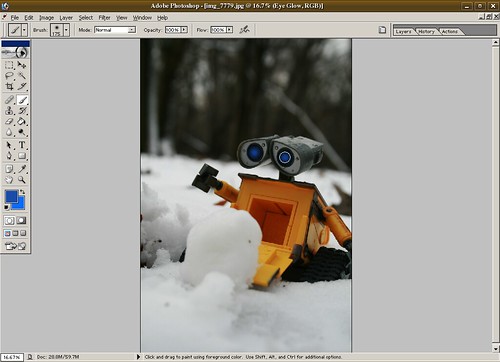
Step 5) Switch to your highlight color and shrink your brush (using the [ key) two or three times, depending on how intense you want the color to be. The smaller the brush, the brighter. Dot your eyes.
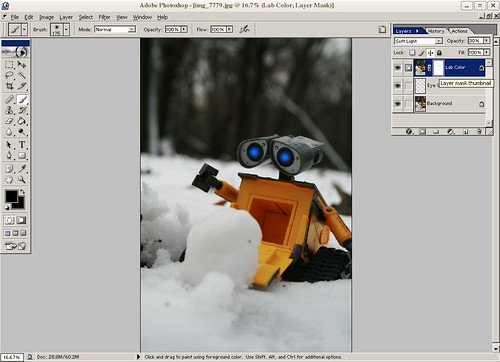
Step 6) Now we add depth. Using our Lab Color layer, we create a layer mask and, with a soft edge brush just smaller than we used for the dark part of the eye, dot the mask where the eye glow is. What this will do is cut a hole through the Lab Color layer, allowing the glow to shine through and create the illusion of depth, because the Eye Glow is behind the top layer.
If you didn't create a Lab Color layer, have no fear. Simply duplicate your Background Layer and use it in the place of the Lab Color. When you're all finished, just flatten the image, do a quick Save As, and there you go! One quick and simple robot with glowing eyes.
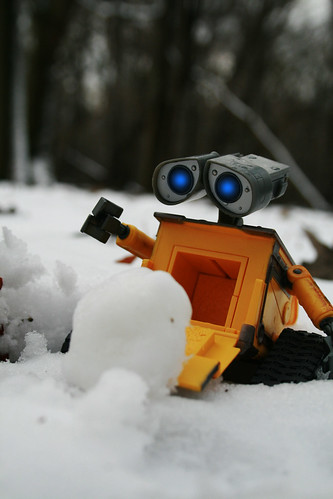
What do you think, Wall-E?
"Whoa"
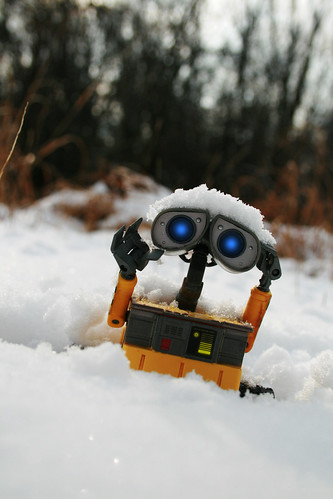
Waste Allocation Load Lifter-EXIF Class
| Camera: | Canon EOS Digital Rebel XTi |
| Exposure: | 0.001 sec (1/800) |
| Aperture: | f/5.6 |
| Focal Length: | 35 mm |
| ISO Speed: | 400 |
| Exposure Bias: | 0/3 EV |
| Flash: | Flash did not fire |
| Orientation: | Horizontal (normal) |
| X-Resolution: | 72 dpi |
| Y-Resolution: | 72 dpi |
| Software: | Adobe Photoshop 7.0 |
| Date and Time: | 2008:12:03 12:38:45 |
| YCbCr Positioning: | Co-Sited |
| Exposure Program: | Aperture priority |
| Date and Time (Original): | 2008:12:03 12:43:05 |
| Date and Time (Digitized): | 2008:12:03 12:43:05 |
| Shutter Speed: | 632020/65536 |
| Metering Mode: | Pattern |
| Color Space: | Uncalibrated |
| Focal Plane X-Resolution: | 4433.295 dpi |
| Focal Plane Y-Resolution: | 4453.608 dpi |
| Compression: | JPEG |
| Image Width: | 2592 pixels |
| Image Height: | 3888 pixels |
Be good,
-Dave
|


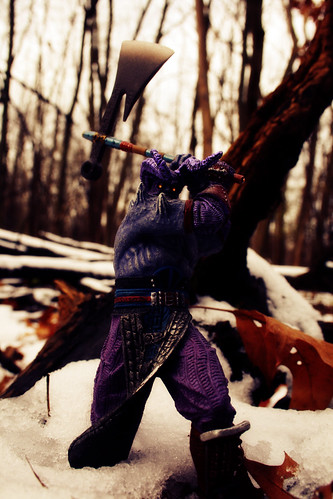
Astaroth is one of those characters that, if you can win with him, you can win with anyone. He's just this big, slow tank with a huge axe. Quick characters will walk circles around him, duck under his wide swings, and pretty much devastate him. Heck, in the demo video for Soulcalibur 2, Maxi runs up the axe handle and kicks Astaroth in his face! But once you learn his moves, you become unstoppable. You discover his quick strikes that keep your opponent off-balance, and you start swinging for the fences while they stagger back. Before long, your friends won't play you any more.
Sorry friends that won't play me any more. It's not my fault you don't know when to block!
This particular Astaroth figure was produced by McFarlane Toys. The deal seemed to be, in exchange for putting Spawn and the McFarlane-designed Necrid in SoulCalibur, McFarlane Toys would release a line of figures based on the game characters. Unfortunately they only released the first set of toys, which included, strangely enough, with both Spawn and Necrid in the lineup. Would have liked a Kilik and Mitsurugi instead, but I'll take what I can get.
Astaroth's Bio, courtesy of Wikipedia:
Introduced in Soulcalibur, Astaroth was created by a cult of Ares led by the priest Kunpaetku to retrieve the cursed sword Soul Edge by their god's command. Upon finding the blade Astaroth realized it was incomplete, and allied himself with its host Nightmare and his minions to harvest living souls necessary to restore the blade. Planning to steal the blade once it was restored, Astaroth was instead confronted by a survivor of one of his attacks and slain. Ares later revived Astaroth, who now had fragments of Soul Edge inside him, to continue after the Soul Edge. Kunpaetku realized his golem was not behaving as instructed, and placed a controlling curse on him. Astaroth resisted and attacked the cult, but in the chaos Kunpaetku escaped and Astaroth learned he was modeled after a human being, the "White Giant". Finding and nearly killing the man, Astaroth broke free of Ares's control and his body cracked and physcially transformed. Merged with the fragments of Soul Edge within him, he now hungered for souls himself and went on a rampage. He was eventually found by Tira, who offered him more power in return for his servitude to Nightmare. Astaroth accepted, with plans to eventually consume their souls and Soul Edge itself when the time was right.
Processing in Photoshop was surprisingly simple. Boost the saturation with Lab Color and add the eye glow on a new layer. Then use a gaussian blur set to Soft Light for the shadow and "bloom", and, as a final touch to bring it all together, create a purple/orange Gradient Map set to Soft Light to bring it all together.
Round 1, EXIF!
| Camera: | Canon EOS Digital Rebel XTi |
| Exposure: | 0.008 sec (1/125) |
| Aperture: | f/9 |
| Focal Length: | 24 mm |
| ISO Speed: | 400 |
| Exposure Bias: | 0/3 EV |
| Flash: | Flash did not fire |
| Orientation: | Horizontal (normal) |
| X-Resolution: | 72 dpi |
| Y-Resolution: | 72 dpi |
| Software: | Adobe Photoshop 7.0 |
| Date and Time: | 2008:12:03 17:41:56 |
| YCbCr Positioning: | Co-Sited |
| Exposure Program: | Aperture priority |
| Date and Time (Original): | 2008:12:03 12:49:30 |
| Date and Time (Digitized): | 2008:12:03 12:49:30 |
| Shutter Speed: | 456510/65536 |
| Metering Mode: | Pattern |
| Color Space: | Uncalibrated |
| Focal Plane X-Resolution: | 4433.295 dpi |
| Focal Plane Y-Resolution: | 4453.608 dpi |
| Compression: | JPEG |
| Image Width: | 2592 pixels |
| Image Height: | 3888 pixels |
Be good,
-Dave
|


8:02 AM by
El Dave
, under

...aaaaand it's snowing. So much for the autumn colors and the days I could go out in just a jacket. While I'm sure Wage doesn't mind shoveling snow (note to self: buy tiny snow shovel), my poor fingers can't handle the cold. The rest of me is fine, but my hands? Forget about it!
We're thinking warm thoughts today here in Chicago and I wanted to share an equally warm picture with you guys. Taking Wage to the Chicago Botanic Garden is always an adventure. Sometimes people recognize him (and our other uglydolls) and other times people stop me and demand to know what I'm doing, which is always kind of awkward. Especially when I'm arguing with the toy for not standing or not being poseable enough for the shot I want.
Today's Plastic 52 was taken, as I said before, in the Chicago Botanic Garden with natural light. We were in the Enabling Garden (which is probably my favorite section, but don't tell the others) and I noticed this Wage-sized gap in the bush. I quickly scooped Wage out of my bag, placed him in the gap and snapped like mad.
Cleanup in Photoshop was just a quick Auto Levels and a bump in Saturation. Nothing fancy!
Why do I hear the Jaws theme when I look at this?
Assume your EXIF honestly,
| Camera: | Canon EOS Digital Rebel XTi |
| Exposure: | 0.033 sec (1/30) |
| Aperture: | f/9 |
| Focal Length: | 49 mm |
| ISO Speed: | 400 |
| Exposure Bias: | 0/3 EV |
| Flash: | Flash did not fire |
| Orientation: | Horizontal (normal) |
| X-Resolution: | 72 dpi |
| Y-Resolution: | 72 dpi |
| Software: | Adobe Photoshop CS3 Windows |
| Date and Time: | 2008:11:17 14:04:15 |
| YCbCr Positioning: | Co-Sited |
| Exposure Program: | Aperture priority |
| Date and Time (Original): | 2008:11:02 14:32:33 |
| Date and Time (Digitized): | 2008:11:02 14:32:33 |
| Shutter Speed: | 321578/65536 |
| Metering Mode: | Pattern |
| Color Space: | sRGB |
| Focal Plane X-Resolution: | 4433.295 dpi |
| Focal Plane Y-Resolution: | 4453.608 dpi |
| White Balance: | Manual |
| Compression: | JPEG |
| Image Width: | 2592 pixels |
| Image Height: | 3888 pixels |
Be good,
-Dave
|


10:32 AM by
El Dave
, under
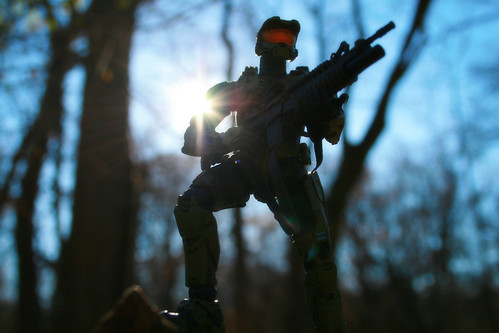
Good lord, do I suck at Halo. Sure, I do ok on the single player modes where the bad guys follow their little pre-programmed paths and I can pick them off with the sniper rifle, but as soon as I'm up against another player it's all over. In fact, I'm so terrible, I won't blame it on the horrible motion sickness I get from first person shooters. But that's not why you're here, is it?
Master Chief's bio, courtesy of Wikipedia:
Master Chief Petty Officer John-117, commonly called the Master Chief, is a fictional character and the main protagonist of the Halo universe, created by Bungie Studios, and is a player character in the trilogy of science fiction first-person shooter video games Halo: Combat Evolved, Halo 2, and Halo 3. Outside of video games, the Master Chief appears in the novels Halo: The Fall of Reach, Halo: The Flood, Halo: First Strike, and Halo: Uprising, and has cameos in Halo: Ghosts of Onyx and the Halo Graphic Novel. He is voiced by Chicago disc jockey Steve Downes in the video games in which he appears.
The Master Chief is one of the most visible symbols of the Halo series and the video game universe. Originally designed by Marcus Lehto, Rob McLees, and Shi Kai Wang, the character is a towering and faceless cybernetically enhanced supersoldier; he is never seen without his green-colored armor or helmet. Steve Downes built his personification of the Chief off a character description which called for a Clint Eastwood-type character of few words.
The Master Chief has been called an icon, a relative newcomer among more established franchise characters, such as Mario, Sonic the Hedgehog, and Lara Croft. While a widely known figure, the Master Chief has received mixed reception. Reviewers such as Kotaku have pointed to the Chief's silent and faceless nature as a weakness to the character, while other publications have stated that this attribute allows players to better assume the role of the Master Chief.
For today's shot, I actually have two pictures of the Chief. While going through my photos, my lovely assistant remarked how much she really liked this one. It seemed more cinematic, like the end credits of a movie. I disagreed and felt that it was too dark, but she's usually right about this sort of thing, so I put my pick on hold and will post about it later on.
Taking Master Chief out to the forest preserve, I found several fallen trees that made for really great stands/scenes. I posed Chief on a craggly stump, turned him around where the sun would be spilling over his shoulder and snapped the shot. In case you were wondering, I grabbed that gun from another McFarlane figure, one of their Military line. It's a little big for him, but not so large that it looks out of place.
Taking him into Photoshop, I tried a neat trick, courtesy of Digital Photography School. It involves tweaking the Lab Colors instead of the usual RGB or CMYK palattes. I like this look a LOT more than just tweaking the saturation levels and will definitely be using it going forward for anything that's a little washed out or just blah looking. After that, I added the usual gaussian blurs to soften the edges and viola! Done!
Elite soldier of the EXIF Corps
| Camera: | Canon EOS Digital Rebel XTi |
| Exposure: | 0.001 sec (1/1250) |
| Aperture: | f/5.6 |
| Focal Length: | 27 mm |
| ISO Speed: | 400 |
| Exposure Bias: | 0/3 EV |
| Flash: | Flash did not fire |
| Orientation: | Horizontal (normal) |
| X-Resolution: | 72 dpi |
| Y-Resolution: | 72 dpi |
| Software: | Adobe Photoshop 7.0 |
| Date and Time: | 2008:12:01 12:50:14 |
| YCbCr Positioning: | Co-Sited |
| Exposure Program: | Aperture priority |
| Date and Time (Original): | 2008:11:28 13:22:07 |
| Date and Time (Digitized): | 2008:11:28 13:22:07 |
| Shutter Speed: | 674216/65536 |
| Metering Mode: | Pattern |
| Color Space: | Uncalibrated |
| Focal Plane X-Resolution: | 4433.295 dpi |
| Focal Plane Y-Resolution: | 4453.608 dpi |
| Compression: | JPEG |
| Image Width: | 3888 pixels |
| Image Height: | 2592 pixels |
Be good,
-Dave
|


7:27 AM by
El Dave
, under

"Meditation brings you wisdom; lack of meditation leaves ignorance. Know well what leads you forward and what hold you back, and choose the path that leads to wisdom."
-Prince Gautama Siddharta
This time of year always makes me stop and reflect on all the things I have and how thankful I am to have them. I am thankful for my family and friends who love me regardless of how childish I can be. I am thankful for the opportunities I have and will continue to have to improve myself. I am thankful for everyone who visits this blog, even if you're stopping by because you saw my photo on Google Image Search.
Gen here is thankful that he is one of the only characters in the Street Fighter series that can switch fighting styles in the middle of a match.
This was taken in the forest preserve across the street in afternoon sunlight. SOTA Toys has done such a great job on these figures and I'm constantly amazed by the poses I can get Gen into. Almost any martial art stance you can think of, these toys can do. The paintjob is great and the variety of extra hands (along with an extra "angry" head) just further expand what you can do with him. Mine came with a pretty wicked mold line around his head, but otherwise, he's one of my favorite figures. Next time I have cash burning a hole in my pocket, the Street Fighter figures are high on that list.
Cleanup in Photoshop was extremely straightforward. Hit Gen with an Auto Levels, then add a Gaussian Blur to smooth out the edges and make the lighting look more natural. One of the things I want to work on is reducing the amount of time I spend in Photoshop, and a big part of that is just taking better pictures to begin with.
Hey, a guy can dream, can't he?
Fool, now you face my EXIF technique!
| Camera: | Canon EOS Digital Rebel XTi |
| Exposure: | 0.004 sec (1/250) |
| Aperture: | f/5 |
| Focal Length: | 42 mm |
| ISO Speed: | 400 |
| Exposure Bias: | 0/3 EV |
| Flash: | Flash did not fire |
| Orientation: | Horizontal (normal) |
| X-Resolution: | 72 dpi |
| Y-Resolution: | 72 dpi |
| Software: | Adobe Photoshop 7.0 |
| Date and Time: | 2008:11:27 11:16:42 |
| YCbCr Positioning: | Co-Sited |
| Exposure Program: | Aperture priority |
| Date and Time (Original): | 2008:11:27 11:52:47 |
| Date and Time (Digitized): | 2008:11:27 11:52:47 |
| Shutter Speed: | 522046/65536 |
| Metering Mode: | Pattern |
| Color Space: | sRGB |
| Focal Plane X-Resolution: | 4433.295 dpi |
| Focal Plane Y-Resolution: | 4453.608 dpi |
| Compression: | JPEG |
| Image Width: | 3888 pixels |
| Image Height: | 2592 pixels |
Be good,
-Dave
|


7:45 AM by
El Dave
, under

On Flickr there is a group called Plastic 52, which is a photo project where you choose a toy from your collection and take a photo of it every week for a year. I have already completed the project once with my wide assortment of Iron Man figures, and wanted to try again using my vinyl Uglydoll named Wage. Because I've been falling behind, I'm going to include the project here as a way to keep me on track and go a little bit into how the shot was done.
This picture features Wage (the orange one on the left) and Wedgehead, who is buried in the leaves. My main goal with these Plastic 52 shots is to try and work different creative muscles than I normally use. Somehow, taking shots of burning alleyways with lots of knives and lasers doesn't seem appropriate with Wage.
I wanted to get a cute autumn shot with Wage, and playing in the leaves definitely fits the bill. Working with my beautiful assistant, we set about gathering leaves and covering Wedgehead. The only problem we ran into was that the leaves we had gathered were from the same spot we were taking the shot, so there weren't any leaves in the background. Sure, we could have just put a rake or something in the back, but it just didn't look right.
Processing in Photoshop was thankfully simple. I tweaked the colors a little and added some film grain, and that was it.
With as easy as this shot was, I'm left wondering why I spend so long on my studio shots...
If you can read this, you are EXIF:
| Camera: | Canon EOS Digital Rebel XTi |
| Exposure: | 0.005 sec (1/200) |
| Aperture: | f/5.6 |
| Focal Length: | 55 mm |
| ISO Speed: | 400 |
| Exposure Bias: | 0/3 EV |
| Flash: | Flash did not fire |
| Orientation: | Horizontal (normal) |
| X-Resolution: | 72 dpi |
| Y-Resolution: | 72 dpi |
| Software: | Adobe Photoshop CS3 Windows |
| Date and Time: | 2008:11:17 14:01:12 |
| YCbCr Positioning: | Co-Sited |
| Exposure Program: | Aperture priority |
| Date and Time (Original): | 2008:11:02 13:55:22 |
| Date and Time (Digitized): | 2008:11:02 13:55:22 |
| Shutter Speed: | 500948/65536 |
| Metering Mode: | Pattern |
| Color Space: | sRGB |
| Focal Plane X-Resolution: | 4433.295 dpi |
| Focal Plane Y-Resolution: | 4453.608 dpi |
| White Balance: | Manual |
| Compression: | JPEG |
| Image Width: | 3888 pixels |
| Image Height: | 2592 pixels |
Be good,
-Dave
|


9:50 AM by
El Dave
, under
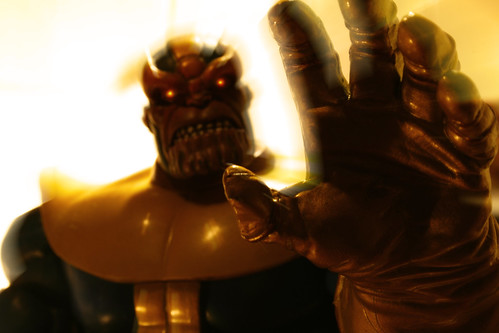
As I've mentioned before, I'm terrible at capturing motion in my photos. Not simply because I'm using action figures (which aren't the liveliest of subjects), but because I just couldn't wrap my head around what capturing something in motion actually meant. As part of the homework I gave myself, I started studying sports photography and just what it means to capture that moment. The split second just before an athlete explodes into action or the fraction of a second where they are on the move.
Applying that concept to toys is always going to be problematic. I went into the studio knowing what I wanted, but was unsure how best to get it. Posing Thanos is always a simple, pleasing task because he only has two poses; standing there with his arms down or standing there with his arms raised. Oh sure, there is a wide variety of subtleties to be found there. Move his head to the side, turn his body either towards or away from the camera, raise one arm or the other.
With my pose selected, I tried different backgrounds and lighting. In the end, I settled on a tracing lamp stood on its side, just behind his shoulder. This little lamp comes in handy, due to its small size and diffused light. It has become my "go to" lamp whenever I'm having trouble lighting something. Next time you're in your local art store, ask where the lightboxes and tracing lamps are.
Before I get into how I processed in Photoshop, let's review a little of Thanos's history, courtesy of Wikipedia:
Thanos is born on Titan, a moon of the planet Saturn to Mentor and Sui-San. Due to a genetic quirk, Thanos is born with the Deviant gene and as such resembles the Deviants — the Eternals' cousin race — more than his own people. Although treated fairly by his race, Thanos is mindful of his appearance and becomes distant, only keeping company with his brother Eros (Starfox). Thanos matures to adulthood, and via the use of bionics and mysticism augments his abilities to become the most powerful of the Titanian-born Eternals, and is often referred to as the Mad Titan.
Bitter at being an outsider, Thanos becomes fascinated with nihilism, embarking on his quest to "please" death, and begins by conducting a nuclear bombardment of Titan that kills millions of his race. Thanos' mother is thought to have died during the bombardment, but years later it is discovered that he kidnaps and then dissects her. He later travels to Earth, and prior to landing his vessel destroys a nearby car to prevent anyone from becoming aware of his existence. Unknown to Thanos, two of the family members in the vehicle survive — the father's spirit is preserved by the Titanian cosmic entity Chronos and is given a new form as Drax the Destroyer while the daughter is found by Thanos' father Mentor and is raised to become the heroine Moondragon.
Taking Thanos into Photoshop, I used a radial blur to bring the lamp light out and spill over the figure. Because of the low F-stop setting, Thanos's head and face were not in focus, so the radial blur gave the illusion of movement. Now, instead of just being out of focus, your eyes follow the lines of the light, which point straight out of the image and into your face, while his hand seems to be swinging in from the other side. All that was left was to do a little cleanup of some of the light that spilled where I didn't want it, and then add the color to his eyes.
Basically, I'm very happy with this one.
Wielder of the reality-altering EXIF Gems
| Camera: | Canon EOS Digital Rebel XTi |
| Exposure: | 15 sec (15) |
| Aperture: | f/20 |
| Focal Length: | 49 mm |
| ISO Speed: | 100 |
| Exposure Bias: | 0/3 EV |
| Flash: | Flash did not fire |
| Orientation: | Horizontal (normal) |
| X-Resolution: | 72 dpi |
| Y-Resolution: | 72 dpi |
| Software: | Adobe Photoshop CS3 Windows |
| Date and Time: | 2008:11:06 20:22:34 |
| YCbCr Positioning: | Co-Sited |
| Exposure Program: | Aperture priority |
| Date and Time (Original): | 2008:11:06 21:05:43 |
| Date and Time (Digitized): | 2008:11:06 21:05:43 |
| Shutter Speed: | -256041/65536 |
| Metering Mode: | Pattern |
| Color Space: | sRGB |
| Focal Plane X-Resolution: | 4433.295 dpi |
| Focal Plane Y-Resolution: | 4453.608 dpi |
| White Balance: | Manual |
| Compression: | JPEG |
| Image Width: | 3888 pixels |
| Image Height: | 2592 pixels |
Be good,
-Dave
|


3:25 PM by
El Dave
, under
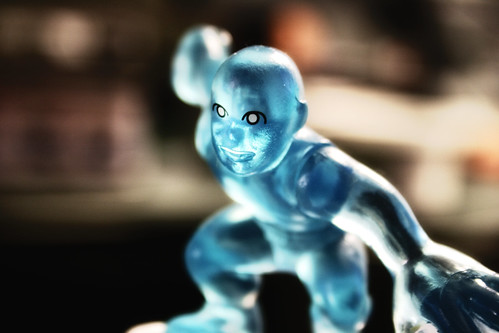
Big learning experience today. I discovered quite a bit about Mr. Bobby "Iceman" Drake that I didn't know, found out what an "Omega-Level Mutant" is, and finally embraced the use of noise in my photography. Not noise like acoustics, but noise like, well we'll get to that in a bit.
First of all, the obligatory biography courtesy of Wikipedia:
Iceman possesses the power to radically decrease the temperature of ambient water vapor in his immediate environment, thereby freezing it into ice. In this manner he is able to quickly form a great variety of ice structures, including projectiles, shields, ladders, baseball bats, etc. He often makes ice slides which form rapidly beneath and behind his feet, pushing him along the slick surface at high speeds. Originally, Iceman's own body temperature would lower dramatically when his powers were active, reaching -105°F within a few tenths of a second (now his body usually converts to organic ice). Iceman is immune to sub-zero temperatures; he is also able to perceive the thermal energy level of objects around him. Because cold is the absence of heat, Iceman does not actually 'emanate' cold; rather, he decreases thermal energy. As mentioned by writer Mike Carey, Iceman is an "an Omega level mutant . . . [and] has powers that can influence the ecosystem of the entire world."
As a long-time fan of the X-Men, I've read my fair share of comic books about super-powered mutants. While Iceman was always a character I had a fondness for, I have to confess to not knowing much about him. Basically, if it wasn't Colossus or Nightcrawler, I didn't really care. After spending a little time playing with this little Iceman figure, I am definitely interested in reading more about him.
The toy itself, like all of Hasbro's Superhero Squad line is adorable. I feel like the crazy overbearing aunt and just want to pinch their little cheeks! Is that weird? That seems weird.
All I'm saying is, I like the toys.
This photo of Iceman was taken on Election Night '08, hanging out with friends and waiting for the election results to come in. This figure was standing on a computer desk, casually backlit by a nearby lamp, and just begging to be shot. Because I did not have my tripod, I lowered the ISO, which is something I usually resist doing. Grain, or Noise, is something I don't normally like in my photos. Other people use it to great effect, but I've never been so fortunate. This time, however, due to whatever combination of factors, the bokeh'd background is noisy, but the figure itself is pretty smooth.
Processing in Photoshop consisted of adjusting the levels and contrast to highlight his translucency, then adding the bloom effect that I add to everything, and then really cranking up the contrast with an Urban Acid-like tweak that I'm really happy about.
Tall, frosty glass of EXIF:
| Camera: | Canon EOS Digital Rebel XTi |
| Exposure: | 0.2 sec (1/5) |
| Aperture: | f/5.6 |
| Focal Length: | 55 mm |
| ISO Speed: | 400 |
| Exposure Bias: | 0/3 EV |
| Flash: | Flash did not fire |
| Orientation: | Horizontal (normal) |
| X-Resolution: | 72 dpi |
| Y-Resolution: | 72 dpi |
| Software: | Adobe Photoshop CS3 Windows |
| Date and Time: | 2008:11:05 17:20:26 |
| YCbCr Positioning: | Co-Sited |
| Exposure Program: | Aperture priority |
| Date and Time (Original): | 2008:11:04 22:12:23 |
| Date and Time (Digitized): | 2008:11:04 22:12:23 |
| Shutter Speed: | 152170/65536 |
| Metering Mode: | Pattern |
| Color Space: | sRGB |
| Focal Plane X-Resolution: | 4433.295 dpi |
| Focal Plane Y-Resolution: | 4453.608 dpi |
| White Balance: | Manual |
| Compression: | JPEG |
| Image Width: | 3888 pixels |
| Image Height: | 2592 pixels |
Be good,
-Dave
|


12:36 PM by
El Dave
, under
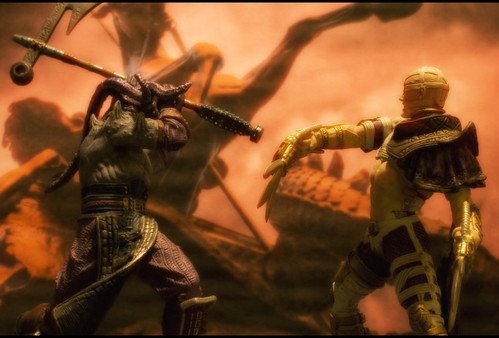
Out of all the fighting games I've played (and there have been many), the Soulcalibur series is far and away my favorite. Sure, Street Fighter, Mortal Kombat and Tekken will always have a special place in my heart, but they'll never replace Soulcalibur.
A little background on the series, courtesy of Wikipedia:
The mystical sword of the legends, the "Soul Edge", ended in the hands of the dread pirate Cervantes of Spain. For the next 25 years he stayed dormant on the remnants of a Spanish port town, taking the souls of those who reached him during their search of the sword. His reign of terror was soon to start, but the joined efforts of a divine warrior (Sophitia) and an underground ninja (Taki) stopped him, breaking one of the twin Soul Edge blades in the process. As it was about to tear itself apart, a young knight (Siegfried) approached the port town. The moment he took the hilt of the cursed blade, Soul Edge released a bright column of light into the sky. This was known as the "Evil Seed", bound to bring calamity and death across its path.
Three years after those events, Soul Edge uses Siegfried as its host, and now Siegfried is Nightmare, a knight wearing azure armor. Europe plunges into a vortex of slaughters as he and his followers claim souls to strengthen the blade in its weakened state. Unknown to them, a group of young warriors met on their journey to stop Soul Edge, and with them three sacred weapons join once again.
This shot features the characters Astaroth and Voldo. I wanted to try and capture the atmosphere that is such a huge part of Soulcaliur and that meant light. I had to make the shot immersive. Just setting the figures in front of the backdrop would not be enough, they had to be part of the scene.
The background was graciously provided by mugley through a Creative Commons license.
In Photoshop, I did my usual gaussian blurs to soften the edges and smooth out the light, then did a slight radial blur on the background. What this did was to cause the light in the back to spill over onto the characters. Voldo, standing in the open, has much more light than Astaroth who is shadowed by the statue behind him. I'm not entirely happy with it, but it's the best I can do at the moment. It looks like I have a date with a few more digital art books before I can create the images I want. Until then, I'll just keep taking pictures and trying new things.
A tale of swords and EXIF...eternally retold
| Camera: | Canon EOS Digital Rebel XTi |
| Exposure: | 30 sec (30) |
| Aperture: | f/25 |
| Focal Length: | 50 mm |
| ISO Speed: | 100 |
| Exposure Bias: | 0/3 EV |
| Flash: | Flash did not fire |
| Orientation: | Horizontal (normal) |
| X-Resolution: | 240 dpi |
| Y-Resolution: | 240 dpi |
| Software: | Adobe Photoshop CS3 Windows |
| Date and Time: | 2008:10:20 14:29:08 |
| Exposure Program: | Aperture priority |
| Date and Time (Original): | 2008:10:20 13:57:32 |
| Date and Time (Digitized): | 2008:10:20 13:57:32 |
| Shutter Speed: | -4906891/1000000 |
| Maximum Lens Aperture: | 265625/100000 |
| Metering Mode: | Pattern |
| Color Space: | Uncalibrated |
| Focal Plane X-Resolution: | 4433.295 dpi |
| Focal Plane Y-Resolution: | 4453.608 dpi |
| Compression: | JPEG |
| Image Width: | 3888 pixels |
| Image Height: | 2632 pixels |
Be good,
-Dave
|


8:13 PM by
El Dave
, under
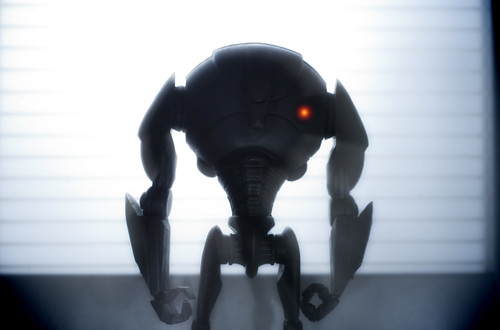
I love it when I go looking for one toy, but find another that I enjoy just as much. That's how I ended up with the B2 Super Battle Droid today. I've been checking the local Targets for the Galactus Mighty Mugg, and when I checked the Target closest to home (which is in a mall and almost never has anything good), I not only found Mugglactus, but I thought I'd also push my luck and see if any Droidekas were left from the Clone Wars series. No Droidekas, but this Super Battle Droid caught my eye.
Let's be honest, the original design for these droids was pretty awful. Horribly proportioned, they just didn't look like anything I'd ever want to own. But that has all changed, baby! They slimmed the torso and widened the hips just enough so that it doesn't look like the first strong wind will destroy the entire batallion, and the addition of the little light on the torso is somehow endearing, even if it throws off his symmetry.
Now it's time for a little history about the B2 Droid, courtesy of Wikipedia:
Super battle droids are upgraded battle droids used by the Techno Union, as portrayed in Attack of the Clones, Revenge of the Sith, and the animated series Star Wars: Clone Wars. They were first unleashed by the Confederacy of Independent Systems during the Battle of Geonosis, the closing battle of Attack of the Clones. One of the main design flaws of the standard battle droid was its reliance on a Droid Control Ship to provide a signal; if the ship was to be disabled, the battle droids would become utterly useless. The super battle droid, or SBD, does not rely on such a signal and thus has a greater capacity for independence, as well as much more aggressive combat intelligence. In the Battle of Geonosis, Super Battle Droids were observed mowing down several of the 'useless' standard battle droids in order to get a clearer shot at the enemy (as seen in Attack of the Clones). Their frames are also larger and more heavily armored. Wrist blasters are mounted on their arms, but they are capable of using certain external weapons, though their large 'hands' make it difficult for them to use other weapons. Due to the high cost of manufacturing a new droid, the super battle droid uses some of the same parts as the standard battle droid, most notably they have a compressed battle droid head, with no neck joint.
For the setup, I initially had him posed much more aggressively. Basically, well, like this.
When I went to process those shots, I always lost the details of his face and I was just left with this big robot-shaped shadow. So that was out, but I noticed how the light fell over his arms and legs, highlighting all the cool details. I wanted to bring out that aspect, but still have him look impressive, which led to the pose we have here. Much more quiet than guns blazing, but more menacing I think.
Processing in Photoshop consisted of a radial blur to get the backlight to overlap the figure better, then adding the red chest light. Because so many of my shots are... brown or orange (I prefer the term golden), I shifted the hue over to the blue end and added a vignette to bring it all together.
All in all, not a groundbreaking photo, but something I can still feel good about.
I feel a disturbance in the EXIF:
| Camera: | Canon EOS Digital Rebel XTi |
| Exposure: | 1 sec (1) |
| Aperture: | f/8 |
| Focal Length: | 50 mm |
| ISO Speed: | 100 |
| Exposure Bias: | 0/3 EV |
| Flash: | Flash did not fire |
| Orientation: | Horizontal (normal) |
| X-Resolution: | 240 dpi |
| Y-Resolution: | 240 dpi |
| Software: | Adobe Photoshop CS3 Windows |
| Date and Time: | 2008:10:14 21:43:33 |
| Exposure Program: | Manual |
| Date and Time (Original): | 2008:10:14 21:29:33 |
| Date and Time (Digitized): | 2008:10:14 21:29:33 |
| Shutter Speed: | 0/1 |
| Maximum Lens Aperture: | 265625/100000 |
| Metering Mode: | Pattern |
| Color Space: | Uncalibrated |
| Focal Plane X-Resolution: | 4433.295 dpi |
| Focal Plane Y-Resolution: | 4453.608 dpi |
| Exposure Mode: | Manual |
| White Balance: | Manual |
| Compression: | JPEG |
| Image Width: | 3732 pixels |
| Image Height: | 2460 pixels |
Be good,
-Dave
|


6:04 PM by
El Dave
, under
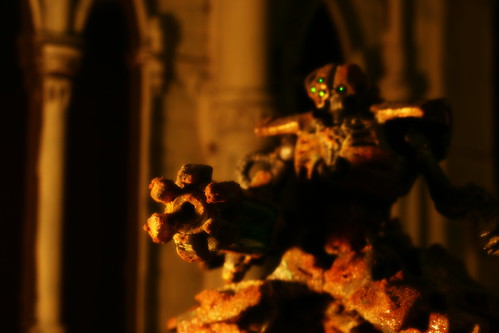
When it comes to Wargaming, I tend to go one of two ways. I gravitate towards the religious extremists (see: Protectorate of Menoth) or as far from the standard army as possible (see: Tyranids). The Necrons are an interesting combination of the two concepts, as they are alien robots serving ancient gods who only desire to see the universe burn. They gave up their mortal bodies to serve their timeless masters, trapped forever in metal tombs that just happen to be their bodies.
I'm starting to think this photoblog should instead be where I start psychoanalyzing myself.
From Wikipedia:
...the Necrons and their masters have finally awoken to reclaim the galaxy, and begin, once again, to herd the living as their cattle. Finally, after so long, the galaxy is ready for the return of the Star Gods of the Necrons. The deadly power of the invincible Eldar Empire is long gone and their race is scattered, the unstoppable might and momentum of the Emperor's Great Crusade has had 10,000 years to grind to a bloody and brutal stalemate against the inimical forces of the galaxy, and the Orkoid races have long since lost whatever cohesion they may ever have had. All who might have opposed the C'tan are either gone or humbled, the galaxy is a swirling maelstrom of regional and factional conflict and the lives of its trillions upon trillions of inhabitants are ripe for the picking. The deathly silent ranks of the Necrons stalk forth across their tomb worlds once again, to reassert their masters' rule and inspire fear in the living.
Today's shot was done on the stovetop with the Destroyer lit by a single tealight candle. The backdrop was a cathedral wall piece made by Armorcast and poorly painted by myself. I'm starting to prefer miniature photography to actually playing the games, because I don't have to finish painting anything!
In Photosh-, I mean GIMP, I added the gaussian blurs and painted in the eyes. Other than that, it was extremely straightforward.
I still want to game.
Necron Lord with EXIF Orb
| Camera: | Canon EOS Digital Rebel XTi |
| Exposure: | 30 sec (30) |
| Aperture: | f/18 |
| Focal Length: | 50 mm |
| ISO Speed: | 100 |
| Exposure Bias: | 0/3 EV |
| Flash: | Flash did not fire |
| Orientation: | Horizontal (normal) |
| X-Resolution: | 72 dpi |
| Y-Resolution: | 72 dpi |
| Date and Time: | 2008:10:04 20:02:31 |
| YCbCr Positioning: | Co-Sited |
| Exposure Program: | Aperture priority |
| Date and Time (Original): | 2008:10:04 19:19:11 |
| Date and Time (Digitized): | 2008:10:04 19:19:11 |
| Shutter Speed: | -321577/65536 |
| Metering Mode: | Pattern |
| Color Space: | sRGB |
| Focal Plane X-Resolution: | 4433.295 dpi |
| Focal Plane Y-Resolution: | 4453.608 dpi |
| White Balance: | Manual |
| Compression: | JPEG |
| Image Type: | Canon EOS DIGITAL REBEL XTi |
| Owner Name: | ( |
| Camera Serial Number: | 1220842575 |
| Custom Functions: | 24, 0, 256, 512, 768, 1024, 1280, 1536, 1792, 2048, 2304, 2560 |
| Model ID: | 2147484214 |
| Tag::Canon::0x0013: | 0, 159, 7, 112 |
| Lens Type: | EF50mm f/2.5 Compact Macro |
| Internal Serial Number: | H1858035 |
| Tag::Canon::0x0098: | 0, 0, 0, 0 |
| Tag::Canon::0x00AA: | 10, 1182, 1024, 1024, 189 |
| Color Space: | 1 |
| Tag::Canon::0x4008: | 129, 129, 129 |
| Tag::Canon::0x4009: | 0, 0, 0 |
| Image Width: | 3888 pixels |
| Image Height: | 2592 pixels |
| Macro Mode: | Normal |
| Image Quality: | Fine |
| Continuous Drive: | Single |
| Focus Mode: | Manual Focus |
| Canon Image Size: | Large |
| Easy Mode: | Manual |
| Contrast: | Normal |
| Saturation: | Normal |
| Metering Mode: | Evaluative |
| Focus Range: | Not Known |
| Canon Exposure Mode: | Aperture-Priority AE |
| Lens Type: | Canon EF 50mm f/2.5 Macro or Sigma 50mm f/2.8 EX or 28mm f/1.8 |
| Lens: | 50mm |
| Max Aperture: | 85 |
| Min Aperture: | 320 |
| Flash Activity: | Flash did not fire |
| Photo Effect: | Off |
| Color Tone: | 0 |
| Focal Type: | Fixed |
| Scaled Focal Length: | 50 |
| Focal Plane Size: | 907 x 605 |
| Flash Guide Number: | 100 |
| ISO: | 100 |
| Measured LV: | 65440 |
| Target Aperture: | 5.6568542494924 |
| Target Exposure Time: | 0 |
| White Balance: | Tungsten |
| F Number: | 18 |
| Camera Type: | EOS Low-end |
| Auto Rotate: | None |
| Image Width: | 3888 |
| Image Height: | 2592 |
| Image Width (As shot): | 3504 |
| Image Height (As shot): | 2336 |
| Shutter Count: | 61521 |
| Color Temperature: | 5200°K |
| Picture Style: | Standard |
| Sensor Width: | 3948 (52-3939 used) |
| Sensor Height: | 2622 (23-2614 used) |
Be good,
-Dave
|


