6:45 AM by
El Dave
, under
Recently, I started a new job on a different shift and it has completely thrown me off. My sleep schedule is all messed up and I just haven't been able or motivated to get into the studio and keep cranking out pictures. My mojo, she is a little low.
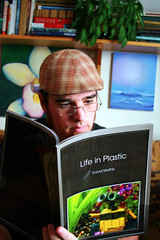
As a way of getting back in the saddle, I'm getting ready for the release of Iron Man. For those that don't know me, Iron Man has always been my favorite character. His was the first comic book I ever read, first I ever bought with my own money (Issue #300, with the holofoil/embossed/chrome cover. Ah, the 90's), and the only comic I actively collect, much to April's embarrassment. I've been waiting for an Iron Man movie since I was 10, so yeah, I'm a little excited. In the film, the main bad guy is Obadiah Stane, aka the Iron Monger. He steals the plans for the original Iron Man armor and rebuilds it into a huge machine that he intends to market to the world's governments, making himself the richest and most powerful man in the world.
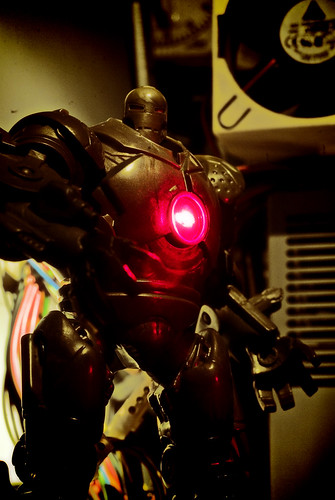
While I admit this one isn't my best work, it kind of demonstrates what I was talking about with the whole using real backgrounds as opposed to printing off photos or using the laptop screen. I really should reshoot it with better light, find a better way of bringing out all the little details of the figure. I blame working. It's severely hampering my ability to take pictures of action figures.
The backdrop is part of an older PC we gutted while we were building out jukebox PC. I've used it before, but this time I only used the power supply and the side panel. I have a few more ideas for this one, but it's going to take a little more work than simply propping up the power supply and taking the picture. Ghetto lighting rig, here I come!
Oh, and one more thing. The Iron Monger doesn't actually look like that. He's blue. This particular Iron Monger is going to go under the knife soon and come out as the Titanium Man, because Titanium Man doesn't look anything like this.
Be good,
-Dave
|


4:00 PM by
El Dave
, under
Like I said last time, I want to talk a little bit about shooting in the great outdoors. As much fun as studio shots are, there is something really special about a sunny day and natural settings that make toy photography that much more enjoyable.
First things first, though, I wanted to thank my buddy Adam for the inspiration on this one. He has an almost identical photo that he posted last June. Unfortunately, I didn't realize until we were driving home from the Chicago Botanic Garden and I was trying to plan out what I wanted to say here that it dawned on me. I turned to my lovely assistant April and said, "I think Adam's already done this one. Like, exactly." And then it got cloudy and is going to rain all weekend so I can't really reshoot. So...thanks Adam and I'm sorry!
Let's get down to business, shall we?
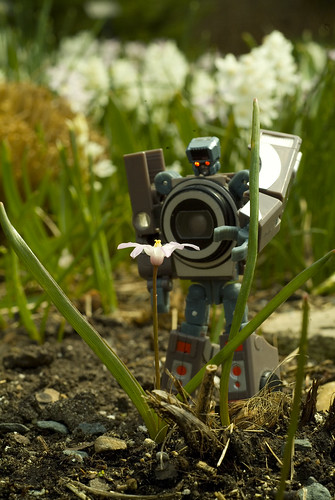
That is the original image, with just a slight bump in Saturation. Not bad, but not really ready for publication. The setup was pretty simple, walk around the botanic garden looking for the one solitary flower that was Reflector-high that was also in a raised planter so I wouldn't have to get down on the ground and block off the entire path (I'm a big guy). After two hours of walking we found this spot. The clouds broke just long enough to give me GREAT light and illuminate the transparent plastic for his eyes. I tried to pose him so that he looks almost curious about the giant flower and is moving to investigate. One of the great things about these Real Gear Transformers is their articulation. You can get a lot of character out of these little pieces of plastic just by posing them a little differently.
Now let's look at what I don't like about the shot.
Most obviously, I see the spots on my lens (hazard of shooting outdoors, I'm afraid) that will have to be cloned out. The shot could stand to be just a tiny bit brighter, so that'll have to changed by tweaking Curves. I'd like just a little more contrast, so we'll overlay a black and white Layer. Finally, I want to add a nice "bloom" effect so there goes a Gaussian Blur.
Sheesh, sounds like I'm mixing drinks here. Let's see what all this work gave us:
Not too bad! Hopefully you'll be inspired to take your toys out and into the great outdoors. If you do, let me know! I'd love to see them.
Be good,
-Dave
|
10:36 AM by
El Dave
, under
Chicago is finally starting to shake off the cruel grip of winter and I can finally go outside again. This means that I'm spending less time in the studio, but don't fret. More photos are coming and we'll get into taking cool shots out in the "real world".
But for now? I'm headed outside and getting some sun. See you then!
Be good,
-Dave
|
6:41 AM by
El Dave
, under
If you follow my Flickr stream you may have noticed a lack of toy photos over the last week or so. Sure I posted every day, but sometimes you just need to change things up a little bit. Keep things fresh. Help exercise different creative muscles. Etc.
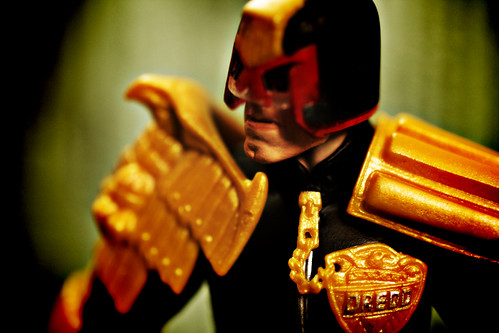
I'm not entirely sure where the idea came from, but while I was processing the shot, I decided I wanted to try and create a "keyhole" effect. I was picturing the Mega City perp peeking out of his secret peep hole just as Judge Dredd gives the order to blow the door down. In order to do that, I would need some sort of distortion/discoloration on the edge(s) of the image. Clicking on my trusty Lens Distortion tool, I was able to create a quick vignette, then set it to Color Burn for the far more impressive distortion than simply setting it to Multiply. Another way to get that border would have been to use a TTV effect, but I like the more organic feel this way has.
Now I just need to repaint those yellow shoulderpads and Judge's Badge. Where's my gold paint?
He is Judge, Jury, and EXIF:
| Camera: | Canon EOS Digital Rebel XTi |
| Exposure: | 0.25 sec (1/4) |
| Aperture: | f/2.5 |
| Focal Length: | 50 mm |
| ISO Speed: | 200 |
| Exposure Bias: | 1/3 EV |
| Flash: | Flash did not fire |
| Orientation: | Horizontal (normal) |
| X-Resolution: | 72 dpi |
| Y-Resolution: | 72 dpi |
| Software: | Adobe Photoshop CS3 Windows |
| Date and Time: | 2008:04:03 20:56:47 |
| YCbCr Positioning: | Co-Sited |
| Exposure Program: | Normal |
| Date and Time (Original): | 2008:04:03 20:43:37 |
| Date and Time (Digitized): | 2008:04:03 20:43:37 |
| Shutter Speed: | 131072/65536 |
| Metering Mode: | Pattern |
| Color Space: | sRGB |
| Focal Plane X-Resolution: | 4433.295 dpi |
| Focal Plane Y-Resolution: | 4453.608 dpi |
| White Balance: | Manual |
| Compression: | JPEG |
| Image Width: | 3888 pixels |
| Image Height: | 2592 pixels |
Be good,
-Dave
|