")
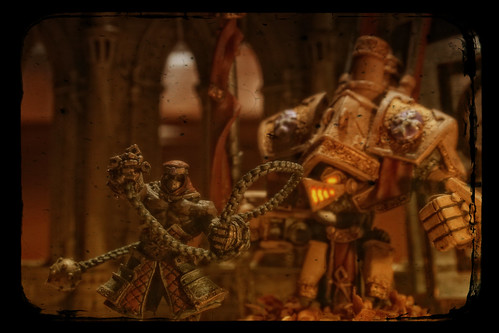
Severius' voice has always resonated with sacred power, and he demonstrates a strength and surety that belies his age. Those who attend him can see and hear the power of unchecked divinity conveyed through his words and deeds. He has vowed to make it his life's work to unite the Menites of western Immoren, to spread the True Faith to all of humanity, and to usher in a new age by hammering the cathedrals of Morrow to rubble and erecting new temples to the Lawgiver.
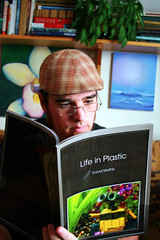
A while back, over on the Twitters, I mentioned that I wanted to work more in Black and White, but wasn't sure how best to improve my meager technique. My friends sent in their tips and I spent an hour adjusting the settings on my camera to reduce the sharpness and contrast to give me a softer, less crisp image. Now, instead of just a black and white snapshot, I get something like what you see above.
Heirarch Severius is a ~28mm wargaming miniature produced by Privateer Press for their Warmachine tabletop game.
Yes, he is standing on top of the acolytes.
Be good,
-Dave
Since I know how low to go
I wont let it show
|


Let your faith be your armor, your fist be your sword.
-Prayer of the Order of the Fist
More playing around with the set from last time. I love using Amon Ad-Raza in games of Warmachine, even though he plays completely opposite the way I think he should.
Amon Ad-Raza and the Guardian Warjack are 30mm wargaming miniatures produced by Privateer Press for the Warmachine tabletop game.
Be good,
-Dave
If only we're nothing at all
|
"Though the time is dark, my faith shines."
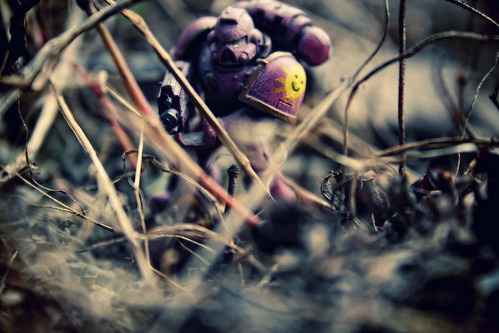
Who said pink was a sissy color? Brother Marine Cuddles would like a word with them...
This Space Marine is a 32mm plastic wargaming miniature produced by Games Workshop.
Be good,
-Dave
Bite your tongue Swear to keep your mouth shut
|
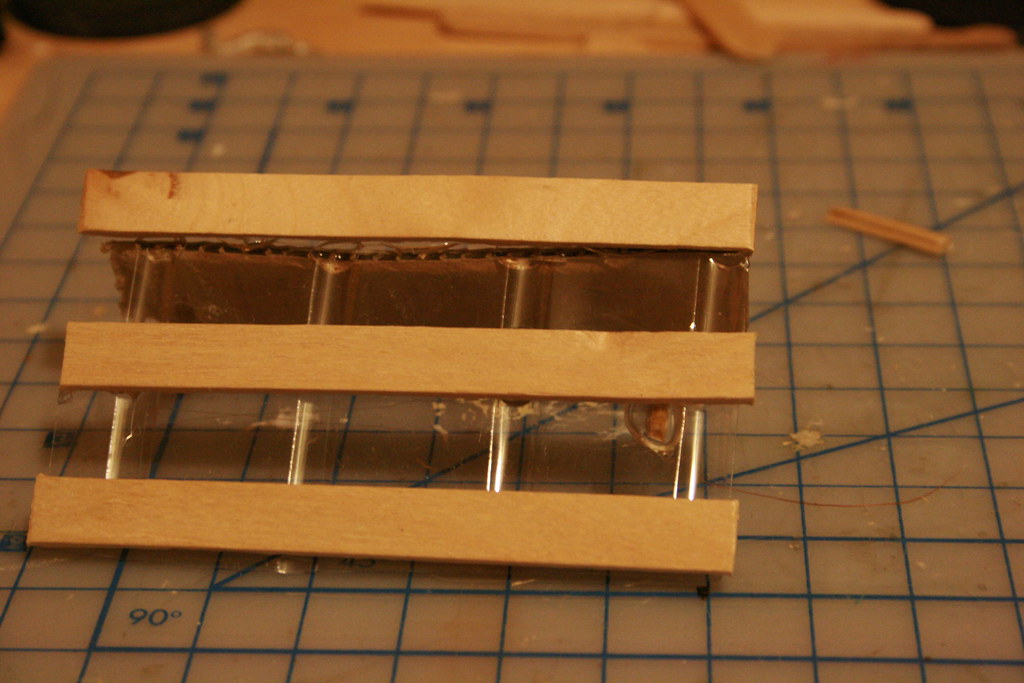
If you're going to take pictures of tiny things, you need a tiny place to take their picture, right? It seems like lately my subjects have been getting smaller than usual. Instead of 6" action figures, I've been enjoying photographing 28-32mm miniature models (roughly 1.1-1.3"). Perspective is hard enough to get right at 6", but when you shrink down to miniature size, things get... difficult.
Which I why I build my own sets. I've done a post about miniature sets before, but it was more of a "Hey, here is one little prop" instead of a complete scene. This time, I'd like to show off a cave/stone set for miniatures.
First, the materials:
5" x 5" Canvas Panels (x3)
Spackle
Superglue
Acrylic Paint
Just a quick note before we get any further. The miniatures in today's shot are Sir Titus and a Hill Giant. Both are pewter wargaming miniatures produced by Reaper Miniatures. Ok, back on topic.
Assemble three of the canvas panels into a floor and two walls, then put the spackle down to create a texture. Give it plenty of time to dry (best to let it sit overnight), and then you can get to painting. I painted mine in browns and grays. Once the whole thing is dry and you're happy with how it looks, set your models on the set, get your lighting where you want it, and start snapping away. Here is what mine looks like, completed and ready to go:
Tiny, right?
Well, here is what that tiny little set and tiny little models looks like through the camera:
Be good,
-Dave
If you're not blind and deaf, how can we pollute your head?
|
")
From Privateer Press.com:
Possessing the most advanced magic and technology in the realm, the Kingdom of Cygnar fields a well-rounded force that battles for the good and just King Leto Raelthorne. Caught between its old enemy Khador and the newer threat of the fanatical Protectorate of Menoth, Cygnar will need every ounce of ingenuity and bravery it has to survive the coming storm.
The Ironclad and Centurion are wargaming miniatures produced by Privateer Press.
I submitted this photo to the No Quarter magazine. Hopefully it will appear in the next issue!
I failed my EXIF test:
| Camera: | Canon EOS Digital Rebel XTi |
| Exposure: | 0.04 sec (1/25) |
| Aperture: | f/11.0 |
| Focal Length: | 55 mm |
| ISO Speed: | 400 |
| Exposure Bias: | 0 EV |
| Flash: | Off |
| File Size: | 3.9 MB |
| File Type: | JPEG |
| MIME Type: | image/jpeg |
| Image Width: | 3888 |
| Image Height: | 2592 |
| Encoding Process: | Baseline DCT, Huffman coding |
| Bits Per Sample: | 8 |
| Color Components: | 3 |
| X-Resolution: | 72 dpi |
| Y-Resolution: | 72 dpi |
| Orientation: | Horizontal (normal) |
| Software: | Adobe Photoshop CS3 Windows |
| Date and Time (Modified): | 2009:02:25 19:43:27 |
| YCbCr Positioning: | Co-sited |
| Exposure Program: | Aperture-priority AE |
| Date and Time (Original): | 2009:02:25 14:17:27-06:00 |
| Date and Time (Digitized): | 2009:02:25 14:17:27 |
| Metering Mode: | Multi-segment |
| Color Space: | sRGB |
| Focal Plane X-Resolution: | 4433.29532497149 dpi |
| Focal Plane Y-Resolution: | 4453.60824742268 dpi |
| Custom Rendered: | Normal |
| Exposure Mode: | Auto |
| White Balance: | Auto |
| Scene Capture Type: | Standard |
| Compression: | JPEG (old-style) |
| Global Angle: | 30 |
| Global Altitude: | 30 |
| Copyright Flag: | False |
| Photoshop Quality: | 12 |
| Photoshop Format: | Standard |
| Progressive Scans: | 3 Scans |
| XMPToolkit: | Adobe XMP Core 4.1-c036 46.276720, Mon Feb 19 2007 22:40:08 |
| Orientation: | Horizontal (normal) |
| Metadata Date: | 2009:02:25 19:43:27-06:00 |
| Creator Tool: | Adobe Photoshop CS3 Windows |
| Format: | image/jpeg |
| Color Mode: | 3 |
| ICCProfile Name: | sRGB IEC61966-2.1 |
| Viewing Conditions Illuminant Type: | D50 |
| Measurement Observer: | CIE 1931 |
| Measurement Flare: | 0.999% |
| Measurement Illuminant: | D65 |
| Color Transform: | YCbCr |
| Flash Return: | No return detection |
| Flash Mode: | Off |
| Flash Function: | False |
| Flash Red Eye Mode: | False |
Be good,
-Dave
|
")
"It saddens me how many of those poor boys are buried out there in my kingdom, but I hate to think where we would be without their noble sacrifice."
-King Leto Raelthorne
From Warmachine: Prime
Trencher infantry fall into two categories, those who are just too hard to say quit, and those who mouthed off to someone important at the wrong time and ended up in the trenches. Trenchers, also known as "gravediggers", are the first to go to the battlefield, and often the last to leave it, if ever. It's their duty to precede even the van by a few hours, if possible, and prepare a potential battlefield for the main force. With trenches, burrow holes, and farrow spike rows, they attempt to make the conflict area favorable for their comrades.
Cygnaran Trenchers are wargaming miniatures produced by Privateer Press.
Who would have thought, in a fantasy world where wizards fight each other with giant steam-powered robots, that you would even have need of guys like this? Obviously my army thought the same way, because my Trenchers ran away at every opportunity.
As for the rain, it was fun to do, but I think there are a few things I will do differently next time. The first of which is to add a little blur to the drops, in wild defiance of the tutorial I followed!
That's how I roll.
Affix EXIF!
| File Size: | 5.6 MB |
| File Type: | JPEG |
| MIME Type: | image/jpeg |
| Image Width: | 3888 |
| Image Height: | 2592 |
| Encoding Process: | Baseline DCT, Huffman coding |
| Bits Per Sample: | 8 |
| Color Components: | 3 |
| X-Resolution: | 72 dpi |
| Y-Resolution: | 72 dpi |
| Orientation: | Horizontal (normal) |
| Software: | Adobe Photoshop CS3 Windows |
| Date and Time (Modified): | 2009:03:09 19:27:19 |
| YCbCr Positioning: | Co-sited |
| Exposure Program: | Manual |
| Date and Time (Original): | 2009:03:09 20:09:08-06:00 |
| Date and Time (Digitized): | 2009:03:09 20:09:08 |
| Metering Mode: | Multi-segment |
| Color Space: | sRGB |
| Focal Plane X-Resolution: | 4433.29532497149 dpi |
| Focal Plane Y-Resolution: | 4453.60824742268 dpi |
| Custom Rendered: | Normal |
| Exposure Mode: | Manual |
| White Balance: | Manual |
| Scene Capture Type: | Standard |
| Compression: | JPEG (old-style) |
| Global Angle: | 30 |
| Global Altitude: | 30 |
| Copyright Flag: | False |
| Photoshop Quality: | 12 |
| Photoshop Format: | Standard |
| Progressive Scans: | 3 Scans |
| XMPToolkit: | Adobe XMP Core 4.1-c036 46.276720, Mon Feb 19 2007 22:40:08 |
| Orientation: | Horizontal (normal) |
| Metadata Date: | 2009:03:09 19:27:19-06:00 |
| Creator Tool: | Adobe Photoshop CS3 Windows |
| Format: | image/jpeg |
| Color Mode: | 3 |
| ICCProfile Name: | sRGB IEC61966-2.1 |
| Viewing Conditions Illuminant Type: | D50 |
| Measurement Observer: | CIE 1931 |
| Measurement Flare: | 0.999% |
| Measurement Illuminant: | D65 |
| Color Transform: | YCbCr |
| Flash Return: | No return detection |
| Flash Mode: | Off |
| Flash Function: | False |
| Flash Red Eye Mode: | False |
Be good,
-Dave
|
")
"Oh, it may be simple, yah, but we dogs like the Nomad. Tough, tenacious, really bears down and tears things up... heh, just like us, eh boys? Why, even the name suits our way of life!"
From Warmachine: Escalation
Before Distruption, alchemical freezing, and technological development became the deciding factor in 'jack warfare - the sword was law. In those days it was not the efficiency of an engine or the composition of the frame; it was how much wreckage a warjack could create before becoming a wreck itself. That was the era of the Nomad, but the old 'jack never did say quit, and it can still be found in service today.
The Nomad is a wargaming miniature produced by Privateer Press.
I'm not 100% happy with this one; the angle is boring and he looks too small. Looks like I'll have to go in for more reshoots.
Oh darn, I have to take more pictures.
Make sure your unit is in EXIF formation:
| Camera: | Canon EOS Digital Rebel XTi |
| Exposure: | 0.167 sec (1/6) |
| Aperture: | f/8.0 |
| Focal Length: | 37 mm |
| Exposure: | 0.00 |
| ISO Speed: | 400 |
| Exposure Bias: | 0 EV |
| Flash: | Off |
| File Size: | 4.5 MB |
| File Type: | JPEG |
| MIME Type: | image/jpeg |
| Image Width: | 2592 |
| Image Height: | 3888 |
| Encoding Process: | Progressive DCT, Huffman coding |
| Bits Per Sample: | 8 |
| Color Components: | 3 |
| X-Resolution: | 240 dpi |
| Y-Resolution: | 240 dpi |
| Orientation: | Horizontal (normal) |
| Software: | Adobe Photoshop CS3 Windows |
| Date and Time (Modified): | 2009:03:06 09:08:49 |
| Exposure Program: | Aperture-priority AE |
| Date and Time (Original): | 2009:03:06 09:04:30-06:00 |
| Date and Time (Digitized): | 2009:03:06 09:04:30 |
| Max Aperture Value: | 4.5 |
| Metering Mode: | Multi-segment |
| Color Space: | sRGB |
| Focal Plane X-Resolution: | 4433.29532497149 dpi |
| Focal Plane Y-Resolution: | 4453.60824742268 dpi |
| Custom Rendered: | Normal |
| Exposure Mode: | Auto |
| White Balance: | Manual |
| Scene Capture Type: | Standard |
| Compression: | JPEG (old-style) |
| Global Angle: | 30 |
| Global Altitude: | 30 |
| Copyright Flag: | False |
| Photoshop Quality: | 12 |
| Photoshop Format: | Progressive |
| Progressive Scans: | 3 Scans |
| XMPToolkit: | Adobe XMP Core 4.1-c036 46.276720, Mon Feb 19 2007 22:40:08 |
| Orientation: | Horizontal (normal) |
| Creator Tool: | Adobe Photoshop CS3 Windows |
| Metadata Date: | 2009:03:06 09:08:49-06:00 |
| Lens: | EF-S18-55mm f/3.5-5.6 |
| Image Number: | 96 |
| Flash Compensation: | 0 |
| White Balance: | Custom |
| Incremental Temperature: | -2 |
| Incremental Tint: | +10 |
| Shadows: | 20 |
| Brightness: | +50 |
| Contrast: | +25 |
| Saturation: | -12 |
| Sharpness: | 15 |
| Luminance Smoothing: | 15 |
| Color Noise Reduction: | 25 |
| Chromatic Aberration R: | 0 |
| Chromatic Aberration B: | 0 |
| Vignette Amount: | 0 |
| Shadow Tint: | 0 |
| Red Hue: | +38 |
| Red Saturation: | +100 |
| Green Hue: | +33 |
| Green Saturation: | +100 |
| Blue Hue: | -7 |
| Blue Saturation: | -100 |
| Fill Light: | 42 |
| Vibrance: | -29 |
| Highlight Recovery: | 74 |
| Clarity: | 0 |
| Defringe: | 2 |
| Hue Adjustment Red: | +19 |
| Hue Adjustment Orange: | 0 |
| Hue Adjustment Yellow: | 0 |
| Hue Adjustment Green: | 0 |
| Hue Adjustment Aqua: | +100 |
| Hue Adjustment Blue: | 0 |
| Hue Adjustment Purple: | 0 |
| Hue Adjustment Magenta: | 0 |
| Saturation Adjustment Red: | -100 |
| Saturation Adjustment Orange: | -29 |
| Saturation Adjustment Yellow: | -76 |
| Saturation Adjustment Green: | -62 |
| Saturation Adjustment Aqua: | -100 |
| Saturation Adjustment Blue: | -45 |
| Saturation Adjustment Purple: | -100 |
| Saturation Adjustment Magenta: | -100 |
| Luminance Adjustment Red: | 0 |
| Luminance Adjustment Orange: | +17 |
| Luminance Adjustment Yellow: | +50 |
| Luminance Adjustment Green: | +10 |
| Luminance Adjustment Aqua: | +2 |
| Luminance Adjustment Blue: | -57 |
| Luminance Adjustment Purple: | 0 |
| Luminance Adjustment Magenta: | 0 |
| Split Toning Shadow Hue: | 0 |
| Split Toning Shadow Saturation: | 6 |
| Split Toning Highlight Hue: | 58 |
| Split Toning Highlight Saturation: | 38 |
| Split Toning Balance: | 0 |
| Parametric Shadows: | 0 |
| Parametric Darks: | 0 |
| Parametric Lights: | +39 |
| Parametric Highlights: | 0 |
| Parametric Shadow Split: | 25 |
| Parametric Midtone Split: | 50 |
| Parametric Highlight Split: | 75 |
| Sharpen Radius: | +1.0 |
| Sharpen Detail: | 25 |
| Sharpen Edge Masking: | 0 |
| Post Crop Vignette Amount: | 0 |
| Convert To Grayscale: | False |
| Tone Curve Name: | Medium Contrast |
| Camera Profile: | ACR 3.4 |
| Has Settings: | True |
| Has Crop: | False |
| Already Applied: | True |
| Tone Curve: | 0, 0 |
| Format: | image/jpeg |
| Color Mode: | 3 |
| ICCProfile Name: | sRGB IEC61966-2.1 |
| Viewing Conditions Illuminant Type: | D50 |
| Measurement Observer: | CIE 1931 |
| Measurement Flare: | 0.999% |
| Measurement Illuminant: | D65 |
| Color Transform: | YCbCr |
| Flash Return: | No return detection |
| Flash Mode: | Off |
| Flash Function: | False |
| Flash Red Eye Mode: | False |
Be good,
-Dave
|
")
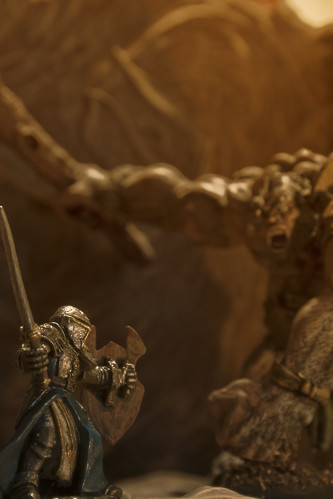
I told you not to botch that Stealth Check...
Courtesy of the Monster Manual:
A Troll eats anything that moves, from grubs to humans, and is rightly feared for its ravenous appetite, feral cunning, and remarkable regenerative power.
Trolls hunt most other living creatures and are unconcerned about the size or numbers of their prey. They regenerate quickly, even after they are "slain". Their regeneration is so powerful, in fact, that trolls can regrow severed body parts. Only fire or acid can kill a troll, and trolls have a healthy fear of fire and acid for this reason.
The Cave Troll Champion is a pewter gaming miniature produced by Reaper Miniatures.
Oh great... They have an EXIF Troll:
| Camera: | Canon EOS Digital Rebel XTi |
| Exposure: | 0.05 sec (1/20) |
| Aperture: | f/8.0 |
| Focal Length: | 55 mm |
| ISO Speed: | 400 |
| Exposure Bias: | 0 EV |
| Flash: | Off |
| File Size: | 3.9 MB |
| File Type: | JPEG |
| MIME Type: | image/jpeg |
| Image Width: | 2592 |
| Image Height: | 3888 |
| Encoding Process: | Progressive DCT, Huffman coding |
| Bits Per Sample: | 8 |
| Color Components: | 3 |
| X-Resolution: | 72 dpi |
| Y-Resolution: | 72 dpi |
| Orientation: | Horizontal (normal) |
| Software: | Adobe Photoshop CS3 Windows |
| Date and Time (Modified): | 2009:03:06 09:06:13 |
| YCbCr Positioning: | Co-sited |
| Exposure Program: | Aperture-priority AE |
| Date and Time (Original): | 2009:03:06 09:06:44-06:00 |
| Date and Time (Digitized): | 2009:03:06 09:06:44 |
| Metering Mode: | Multi-segment |
| Color Space: | sRGB |
| Focal Plane X-Resolution: | 4433.29532497149 dpi |
| Focal Plane Y-Resolution: | 4453.60824742268 dpi |
| Custom Rendered: | Normal |
| Exposure Mode: | Auto |
| White Balance: | Manual |
| Scene Capture Type: | Standard |
| Compression: | JPEG (old-style) |
| Global Angle: | 30 |
| Global Altitude: | 30 |
| Copyright Flag: | False |
| Photoshop Quality: | 12 |
| Photoshop Format: | Progressive |
| Progressive Scans: | 3 Scans |
| XMPToolkit: | Adobe XMP Core 4.1-c036 46.276720, Mon Feb 19 2007 22:40:08 |
| Orientation: | Horizontal (normal) |
| Metadata Date: | 2009:03:06 09:06:13-06:00 |
| Creator Tool: | Adobe Photoshop CS3 Windows |
| Format: | image/jpeg |
| Color Mode: | 3 |
| ICCProfile Name: | sRGB IEC61966-2.1 |
| Viewing Conditions Illuminant Type: | D50 |
| Measurement Observer: | CIE 1931 |
| Measurement Flare: | 0.999% |
| Measurement Illuminant: | D65 |
| Color Transform: | YCbCr |
| Flash Return: | No return detection |
| Flash Mode: | Off |
| Flash Function: | False |
| Flash Red Eye Mode: | False |
Be good,
-Dave
|
")
In honor of my buddy Jason's decision to run his first Dungeons & Dragons game, I present one of D&D's oldest monsters.
Say hello to the Umber Hulk:
An Umber Hulk is a powerful subterranean predator from the Dungeons and Dragons roleplaying game. Umber hulks stand at 8 feet tall and possess large mandibles and huge claws capable of burrowing through solid stone. They have four eyes. The two smaller eyes provide normal vision while the two larger ones enable the creature to see in the dark. Furthermore, anyone who looks directly into the beast's four eyes may suffer from a debilitating sense of confusion.
Umber hulks eat young purple worms, anhkhegs, and similiar creatures. However, their favorite prey are humans!
Even though the Umber Hulk is a subterranean monster, I found it very difficult to dig tunnels that were both in scale for the miniature and large enough for the camera to fit. Seeking a compromise, I found a splintered tree where the figure could stand and the base was mostly hidden. As a happy accident, it looks like the beast is tearing through whatever hasty barricades the players have erected.
In Photoshop, I tried to create an HDR effect out of a single exposure and tweaked the saturation a little bit. I added the black "widescreen" lines primarily to hide the figure's base. That they look cool with the HDR is an added bonus.
I have a +5 bonus to my EXIF save:
| Camera: | Canon EOS Digital Rebel XTi |
| Exposure: | 0.01 sec (1/100) |
| Aperture: | f/11.0 |
| Focal Length: | 55 mm |
| ISO Speed: | 400 |
| Exposure Bias: | 0 EV |
| Flash: | Off |
| File Size: | 5.5 MB |
| File Type: | JPEG |
| MIME Type: | image/jpeg |
| Image Width: | 3888 |
| Image Height: | 2592 |
| Encoding Process: | Baseline DCT, Huffman coding |
| Bits Per Sample: | 8 |
| Color Components: | 3 |
| X-Resolution: | 72 dpi |
| Y-Resolution: | 72 dpi |
| Orientation: | Horizontal (normal) |
| Software: | Adobe Photoshop CS3 Windows |
| Date and Time (Modified): | 2009:02:25 22:38:28 |
| YCbCr Positioning: | Co-sited |
| Exposure Program: | Aperture-priority AE |
| Date and Time (Original): | 2009:02:25 14:23:33-06:00 |
| Date and Time (Digitized): | 2009:02:25 14:23:33 |
| Metering Mode: | Multi-segment |
| Color Space: | sRGB |
| Focal Plane X-Resolution: | 4433.29532497149 dpi |
| Focal Plane Y-Resolution: | 4453.60824742268 dpi |
| Custom Rendered: | Normal |
| Exposure Mode: | Auto |
| White Balance: | Auto |
| Scene Capture Type: | Standard |
| Compression: | JPEG (old-style) |
| Global Angle: | 30 |
| Global Altitude: | 30 |
| Copyright Flag: | False |
| Photoshop Quality: | 12 |
| Photoshop Format: | Standard |
| Progressive Scans: | 3 Scans |
| XMPToolkit: | Adobe XMP Core 4.1-c036 46.276720, Mon Feb 19 2007 22:40:08 |
| Orientation: | Horizontal (normal) |
| Metadata Date: | 2009:02:25 22:38:28-06:00 |
| Creator Tool: | Adobe Photoshop CS3 Windows |
| Format: | image/jpeg |
| Color Mode: | 3 |
| ICCProfile Name: | sRGB IEC61966-2.1 |
| Viewing Conditions Illuminant Type: | D50 |
| Measurement Observer: | CIE 1931 |
| Measurement Flare: | 0.999% |
| Measurement Illuminant: | D65 |
| Color Transform: | YCbCr |
| Flash Return: | No return detection |
| Flash Mode: | Off |
| Flash Function: | False |
| Flash Red Eye Mode: | False |
Be good,
-Dave
|
")
From Warmachine Prime:
The most recognized heavy 'jack in the Cygnaran arsenal, the Ironclad is a walking behemoth of metal nearly thrice the size of a man. Gigantic smokestacks blow sooty "breath" from its hearthfire furnace, and a bright orange glow emits from its face grill, lending a fiery and fearsome gaze.
Armed with a powerful quake hammer, the Ironclad smashes lesser combatants to shrapnel with its massive blows; sometimes just one strike from this hammer has toppled even another heavy 'jack. The Ironclad's durable armor - smelted from precious ores harvested from the roots of the tallest mountains - provides fantastic protection from all but the heaviest impacts, and because of these things, the Cygnaran Ironclad is renowned for leading most warjack charges.
The Ironclad is a miniature wargaming model produced by Privateer Press for use in Warmachine. It can be ordered via the PP website or purchased in any local hobby shop.
Taking the Ironclad outside, I found a nice little divot in the ground that, once I got the figure balanced, hid both his legs and base. While this effectively cuts the figure in half, but by showing some of the ground, it gives the impression of the machine climbing an embankment, getting ready to smash you with that big hammer of his.
Cleanup in Photoshop consisted of tweaking the saturation and Lab Color, then painting the glow on his face. Finally, I used the clone stamp to create the "smoke" by cloning some of that white sky down just over the tops of the smokestacks.
Roll 2d6 and add the weapon's EXIF:
| Camera: | Canon EOS Digital Rebel XTi |
| Exposure: | 0.025 sec (1/40) |
| Aperture: | f/11.0 |
| Focal Length: | 50 mm |
| ISO Speed: | 400 |
| Exposure Bias: | 0 EV |
| Flash: | Off |
| File Size: | 4.0 MB |
| File Type: | JPEG |
| MIME Type: | image/jpeg |
| Image Width: | 2592 |
| Image Height: | 3528 |
| Encoding Process: | Baseline DCT, Huffman coding |
| Bits Per Sample: | 8 |
| Color Components: | 3 |
| X-Resolution: | 72 dpi |
| Y-Resolution: | 72 dpi |
| Orientation: | Horizontal (normal) |
| Software: | Adobe Photoshop CS3 Windows |
| Date and Time (Modified): | 2009:02:13 13:24:59 |
| YCbCr Positioning: | Co-sited |
| Exposure Program: | Aperture-priority AE |
| Date and Time (Original): | 2009:02:13 13:28:13-06:00 |
| Date and Time (Digitized): | 2009:02:13 13:28:13 |
| Metering Mode: | Multi-segment |
| Color Space: | sRGB |
| Focal Plane X-Resolution: | 4433.29532497149 dpi |
| Focal Plane Y-Resolution: | 4453.60824742268 dpi |
| Custom Rendered: | Normal |
| Exposure Mode: | Auto |
| White Balance: | Manual |
| Scene Capture Type: | Standard |
| Compression: | JPEG (old-style) |
| Global Angle: | 30 |
| Global Altitude: | 30 |
| Copyright Flag: | False |
| Photoshop Quality: | 12 |
| Photoshop Format: | Standard |
| Progressive Scans: | 3 Scans |
| XMPToolkit: | Adobe XMP Core 4.1-c036 46.276720, Mon Feb 19 2007 22:40:08 |
| Orientation: | Horizontal (normal) |
| Metadata Date: | 2009:02:13 13:24:59-06:00 |
| Creator Tool: | Adobe Photoshop CS3 Windows |
| Format: | image/jpeg |
| Color Mode: | 3 |
| ICCProfile Name: | sRGB IEC61966-2.1 |
| Viewing Conditions Illuminant Type: | D50 |
| Measurement Observer: | CIE 1931 |
| Measurement Flare: | 0.999% |
| Measurement Illuminant: | D65 |
| Color Transform: | YCbCr |
| Flash Return: | No return detection |
| Flash Mode: | Off |
| Flash Function: | False |
| Flash Red Eye Mode: | False |
Be good,
-Dave
|
")
One could be forgiven for assuming I have an unhealthy fixation on the Adeptus Mechanicus. There is just something about a cyborg monk that sets me all a'flutter, and this particular 32mm model hits all the right notes. I added the little arms, aka mechadendrites, taken from a Dr. Octopus Heroclix figure. I actually need another Doc Ock just so I can make a mold of the arms to use in future projects!
In setting up this shot, I pictured the Tech Priest as an Explorator, leading exhibitions out into the galactic fringes in search of lost knowledge.
These members of the Cult Mechanicus were something of a breed apart from their kin. Any Techpriest was free to join their ranks where they undertook to complete the Quest for Knowledge across the stars in order to seek out undiscovered data, chart uncatalogued phenomena, find forgotten archeotech and learn of new unknown forms of life. As such, research stations, explorer vessels and any outpost of any distance from a Forge World are likely to be manned by Explorators of the Adeptus Mechanicus. Their brethren would call them foolish for their actions though they consider themselves as intrepid adventurers that explore the unknown reaches of the galaxy.
The exploits of successful Explorators are known to found many great prizes that have enhanced the Quest for Knowledge though many others have met grisly deaths in the hostile galaxy. In some cases, the actions of an Explorator have unleashed cataclysmic horrors on Mankind due to their ill-conceived prying though such events are rare.
An Explorator will not be visibly different from a fellow Techpriest though they will be a senior official within a warband.
I love the idea that the guys trying to learn how to save human kind are sometimes the ones who destroy entire chunks of it.
For this shot, I found a mossy tree stump that was flat enough for the Explorator to stand on (his feet are tiny). I tried several different zooms, some where it was just him and a vast expanse of moss and some, like this, that were up close and you can see the cool details of the plant. The pulled back zoom looked pretty good, but, because the model is only head and shoulders taller than a US Quarter, I lost the details of the figure. Maybe next time I'll post both versions.
Taking him into Photoshop, I first did a little selective coloring on the moss to make it a more rusty orange (to better suit the whole machine motif), then painted the spotlight the same way I do robot eyes. Finally, I felt that his robe was a little flat. There have been many complaints about how I paint my miniatures; the most common being that they are too dark or that everything is brown. Because of this, I went back and painted over his robe with a little red, set to Overlay, which really made the guy pop.
EXIF for the EXIF God:
| Camera: | Canon EOS Digital Rebel XTi |
| Exposure: | 0.002 sec (1/500) |
| Aperture: | f/2.5 |
| Focal Length: | 50 mm |
| ISO Speed: | 400 |
| Exposure Bias: | 0 EV |
| Flash: | Off |
| File Size: | 3.6 MB |
| File Type: | JPEG |
| MIME Type: | image/jpeg |
| Image Width: | 3306 |
| Image Height: | 2592 |
| Encoding Process: | Baseline DCT, Huffman coding |
| Bits Per Sample: | 8 |
| Color Components: | 3 |
| X-Resolution: | 72 dpi |
| Y-Resolution: | 72 dpi |
| Orientation: | Horizontal (normal) |
| Software: | Adobe Photoshop CS3 Windows |
| Date and Time (Modified): | 2009:02:13 13:36:56 |
| YCbCr Positioning: | Co-sited |
| Exposure Program: | Aperture-priority AE |
| Date and Time (Original): | 2009:02:13 13:16:03-06:00 |
| Date and Time (Digitized): | 2009:02:13 13:16:03 |
| Metering Mode: | Multi-segment |
| Color Space: | sRGB |
| Focal Plane X-Resolution: | 4433.29532497149 dpi |
| Focal Plane Y-Resolution: | 4453.60824742268 dpi |
| Custom Rendered: | Normal |
| Exposure Mode: | Auto |
| White Balance: | Manual |
| Scene Capture Type: | Standard |
| Compression: | JPEG (old-style) |
| Global Angle: | 30 |
| Global Altitude: | 30 |
| Copyright Flag: | False |
| Photoshop Quality: | 12 |
| Photoshop Format: | Standard |
| Progressive Scans: | 3 Scans |
| XMPToolkit: | Adobe XMP Core 4.1-c036 46.276720, Mon Feb 19 2007 22:40:08 |
| Orientation: | Horizontal (normal) |
| Metadata Date: | 2009:02:13 13:36:56-06:00 |
| Creator Tool: | Adobe Photoshop CS3 Windows |
| Format: | image/jpeg |
| Color Mode: | 3 |
| ICCProfile Name: | sRGB IEC61966-2.1 |
| Viewing Conditions Illuminant Type: | D50 |
| Measurement Observer: | CIE 1931 |
| Measurement Flare: | 0.999% |
| Measurement Illuminant: | D65 |
| Color Transform: | YCbCr |
| Flash Return: | No return detection |
| Flash Mode: | Off |
| Flash Function: | False |
| Flash Red Eye Mode: | False |
Be good,
-Dave
|
Since the weather is still in the low teens outside, I thought I'd take this opportunity to do a fun little tutorial. This one isn't so much about any photographic techniques, but instead I wanted to go into making sets for either your toys or any miniatures you have.
Today (well, last night actually) I built this bit of wall out of things sitting around the house. For this project you will need a few simple things.
Tools:
- Hot Glue Gun
- Acrylic Paints
- Paintbrushes
- Exacto Knife
Materials:
- Popsicle Sticks
- Thick, Sturdy Plastic
- Cardboard
- Little Metal Scrapbook Things*
- Flock
To start, measure out how large you want your wall to be, then cut the plastic to form the base (I used plastic from a toy package) that your wall will stand on. If the plastic is wobbly, use the popsicle sticks to strengthen it.
Next, cut the cardboard to make your wall. For this, I used the inside "handle" of a box as it was the right size and the corner was torn, giving it a cool worn look. Cut up another popsicle stick and use the pieces to prop the wall up. Using your exacto knife, make small, even incisions in the cardboard and slide your Little Metal Scrapbook Things inside to make cool rivets.
By now your hot glue gun is heated up and ready to go. Assemble the pieces and glue them together, taking care not to burn your fingers like I often do.
When everything is assembled, it looks something like this.
")
")
")
Before we paint it, I like to give it a coat of primer to help the paint stick. Any can of spraypaint that says Primer will do.
")
")
With paint (I didn't paint the back. Shhh!):
")
Once you get it painted, you'll need to add some flock to the base. What this means is adding some material to help create the illusion of solid ground. Most people use sand, but here I have a mixture of cinnamon, sugar, and red pepper flakes. Normally it isn't a good idea to use organic materials as flock, but I've added a nice thick coat of aerosol sealer to keep anything from rotting.
")
Safety note. Kids, cinnamon and red pepper powder can feel like a near lethal combination when inhaled. Even a little bit is going to really hurt. My nose is still runny!
So now you've assembled, painted, flocked, and sealed your wall. Now what?
PICTURES!
")
")
Be good,
-Dave
*I have been informed by my lovely assistant April that the Little Metal Scrapbook Things are called Brads and can be found in most craft/scrapbooking stores.
|
")
")
")
")
")
")
")
")
")
")
