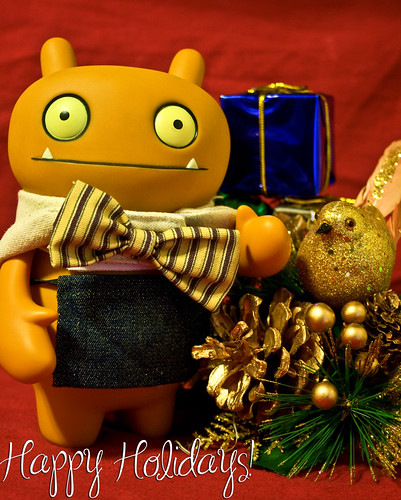
Aaaand with that, I would like to wish you and yours Happy Holidays and all the best in the new year. Wage and myself are going to be taking two weeks off for the annual Davemas celebrations and will return with more pictures (and hopefully a new book!) on January 7th.
Stay warm, stay safe, and we'll see you next year!
I'm dreaming of a EXIF Christmas:
| Camera: | Canon EOS Digital Rebel XTi |
| Exposure: | 0.167 sec (1/6) |
| Aperture: | f/4.5 |
| Focal Length: | 35 mm |
| ISO Speed: | 800 |
| Exposure Bias: | 0/3 EV |
| Flash: | Flash did not fire |
| Orientation: | Horizontal (normal) |
| X-Resolution: | 240 dpi |
| Y-Resolution: | 240 dpi |
| Software: | Adobe Photoshop CS3 Windows |
| Date and Time: | 2008:12:24 11:48:46 |
| Exposure Program: | Normal |
| Date and Time (Original): | 2008:12:24 12:39:28 |
| Date and Time (Digitized): | 2008:12:24 12:39:28 |
| Shutter Speed: | 2584963/1000000 |
| Maximum Lens Aperture: | 4/1 |
| Metering Mode: | Pattern |
| Color Space: | sRGB |
| Focal Plane X-Resolution: | 4433.295 dpi |
| Focal Plane Y-Resolution: | 4453.608 dpi |
| White Balance: | Manual |
| Compression: | JPEG |
| Image Width: | 2592 pixels |
| Image Height: | 3232 pixels |
Be good,
-Dave
|


Today's update is going to be a bit different today, because I have two, count them two big announcements!
Announcement the First: I am going to be taking a short break over the holidays, from Christmas until after my birthday (Jan. 5th). Wednesday's Plastic 52 will be the last update this year and the Plastic 52 on January 7th will be my triumphant return to the blogospheres.
Announcement the Second: During my break, I will be hard at work getting my first book published! I received a great Foreword by a good friend of mine and will be publishing through Lulu.com. Expect a formal announcement once everything is all put together and I hear back from the publisher.
I hope everyone enjoys their holidays and I will see you...in the future!
For auld EXIF syne:
| Camera: | Canon EOS Digital Rebel XTi |
| Exposure: | 0.003 sec (1/320) |
| Aperture: | f/9 |
| Focal Length: | 30 mm |
| ISO Speed: | 400 |
| Exposure Bias: | 0/3 EV |
| Flash: | Flash did not fire |
| Orientation: | Horizontal (normal) |
| X-Resolution: | 72 dpi |
| Y-Resolution: | 72 dpi |
| Software: | Adobe Photoshop 7.0 |
| Date and Time: | 2008:12:06 13:20:36 |
| YCbCr Positioning: | Co-Sited |
| Exposure Program: | Aperture priority |
| Date and Time (Original): | 2008:12:03 12:48:49 |
| Date and Time (Digitized): | 2008:12:03 12:48:49 |
| Shutter Speed: | 545386/65536 |
| Metering Mode: | Pattern |
| Color Space: | Uncalibrated |
| Focal Plane X-Resolution: | 4433.295 dpi |
| Focal Plane Y-Resolution: | 4453.608 dpi |
| Compression: | JPEG |
| Image Width: | 2592 pixels |
| Image Height: | 3888 pixels |
Be good,
-Dave
|


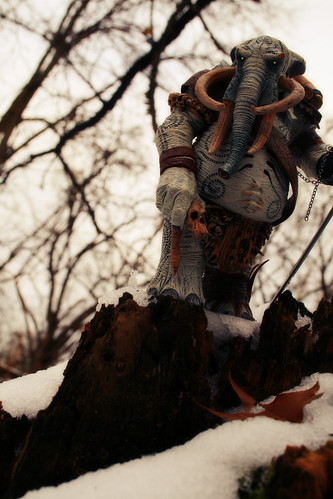
Have you ever seen a figure that you knew nothing about, but knew you had to have?
Enter: Monev the Gale.
From Wikipedia:
Voiced by: Masuo Amada (Japanese), Peter Spellos (English)
Monev the Gale is the first Gung-Ho Gun to fight Vash. Knives locks him in a cell to train his body for twenty years in order to gain the skill and power required to kill Vash. He wears a powered battle suit and carries two high-powered chain guns on his arms. These guns fire extremely fast due to the pressure chambers located on his back, and have tremendous stopping power, enough to tear through entire buildings. He also carries a wide variety of weapons in a big cloth rucksack, including an enormous minigun, powerful enough to punch through a bank vault. He is defeated by Vash and killed afterward as punishment. His life is spared in the anime, but is then killed by E.G. Mine along with Dominique due to his failure.
While I have never read the manga (I hear it is excellent), I have seen parts of the cartoon, and am familiar enough with Vash the Stampede and the other main characters in Trigun. Monev was actually given to me by my buddy Sid, because I kept hassling him about never opening his toys, especially awesome ones like Monev. Thinking it would get me off his back, Sid handed me the figure, telling me to go take pictures or something and leave him alone.
Clearly I am well regarded within my social circle.
Monev was shot in the forest preserve, in a blatant imitation of this photo by my friend Dr. Beef. Go check her stuff out; it's so much fun!
Photoshopping consisted of Auto Levels and a Lab Color tweak to make the little details pop. I really think I'm getting spoiled with this Lab Color thing. Take the picture, run the action, Save As... and I'm done! Can you imagine how short these blog entries would be if all I had to do was post a Wikipedia link and the picture?
Not that this is much better, mind.
Peace and EXIF!
| Camera: | Canon EOS Digital Rebel XTi |
| Exposure: | 0.003 sec (1/400) |
| Aperture: | f/4 |
| Focal Length: | 27 mm |
| ISO Speed: | 400 |
| Exposure Bias: | 0/3 EV |
| Flash: | Flash did not fire |
| Orientation: | Horizontal (normal) |
| X-Resolution: | 72 dpi |
| Y-Resolution: | 72 dpi |
| Software: | Adobe Photoshop 7.0 |
| Date and Time: | 2008:12:01 13:30:02 |
| YCbCr Positioning: | Co-Sited |
| Exposure Program: | Aperture priority |
| Date and Time (Original): | 2008:11:27 11:54:54 |
| Date and Time (Digitized): | 2008:11:27 11:54:54 |
| Shutter Speed: | 566484/65536 |
| Metering Mode: | Pattern |
| Color Space: | Uncalibrated |
| Focal Plane X-Resolution: | 4433.295 dpi |
| Focal Plane Y-Resolution: | 4453.608 dpi |
| Compression: | JPEG |
| Image Width: | 2592 pixels |
| Image Height: | 3888 pixels |
Be good,
Dave
|


6:15 PM by
El Dave
, under

Thanks to the holidays, I've been baking like mad and our kitchen looks like a tornado went through. Wage asked to take some of the pressure off of me and took over the baking of some Lemon Shortbread cookies. While I am grateful for the help, it would have been nice of him to leave me some!
I mean, just one would've been nice.
I actually had to make a second recipe, because I forgot to take pictures the first time around. Because Wage wasn't there to help with the first thing I baked, it turned out terrible, but these cookies turned out fantastic! Or so I'm told.
2 cups EXIF powder:
| Camera: | Canon EOS Digital Rebel XTi |
| Exposure: | 0.067 sec (1/15) |
| Aperture: | f/5.6 |
| Focal Length: | 49 mm |
| ISO Speed: | 800 |
| Exposure Bias: | 0/3 EV |
| Flash: | Flash did not fire |
| Orientation: | Horizontal (normal) |
| X-Resolution: | 72 dpi |
| Y-Resolution: | 72 dpi |
| Software: | Adobe Photoshop 7.0 |
| Date and Time: | 2008:12:17 07:49:46 |
| YCbCr Positioning: | Co-Sited |
| Exposure Program: | Normal |
| Date and Time (Original): | 2008:12:15 21:01:39 |
| Date and Time (Digitized): | 2008:12:15 21:01:39 |
| Shutter Speed: | 256042/65536 |
| Metering Mode: | Pattern |
| Color Space: | Uncalibrated |
| Focal Plane X-Resolution: | 4433.295 dpi |
| Focal Plane Y-Resolution: | 4453.608 dpi |
| Compression: | JPEG |
| Image Width: | 2592 pixels |
| Image Height: | 3888 pixels |
Be good,
-Dave
|


5:11 AM by
El Dave
, under
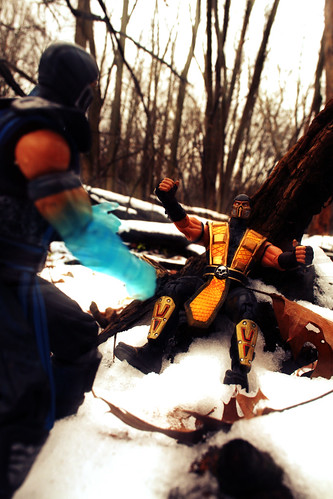
I wasn't expecting much when I bought these Mortal Kombat figures. I have the Kung Lau toy, which is nice, but it's nothing really special. Something about these ninjas makes me really happy, and they're so much fun to shoot!
Brief info RE: Mortal Kombat:
Mortal Kombat is a best-selling series of fighting games created by Ed Boon and John Tobias. Mortal Kombat began as a series of arcade games, which were picked up by Acclaim Entertainment for the home console versions. Now Midway Games exclusively creates home versions of Mortal Kombat. It is especially noted for its digitized sprites (which differentiated it from its contemporaries' hand-drawn sprites), and its high levels of blood and gore, including, most notably, its graphic fatalities—finishing moves, requiring a sequence of buttons to perform, which, in part, led to the creation of the ESRB. The series itself is also known for replacing the hard c sound with the letter K, thus deliberately misspelling the word "combat," as well as other words with the hard c sound (example: "klose" quarters instead of "close" quarters).
In the spirit of Mortal Kombat, I will be using K's instead of hard C's for the rest of this post.
Sub Zero is my default favorite karacter, having the easiest moves and the easiest initial fatality. Plus, I'm always interested in water/ice based karacters. Skorpion, being Sub Zero's nemesis, bekame my nemesis as well. Heading out to the forest preserve, I had to pik a day when it was above freezing to keep my kamera from being frozen solid. I found some small stiks and twigs that were skaled just righ- You know what? No more K's.
The most important thing about shooting outdoors is to find a backdrop that works with the size of your toys and doesn't pull the viewer away and remind them that they're looking at a toy. The goal is always to make the scene as realistic as possible; in this case, Sub Zero and Scorpion are in the middle of a fight, with Scorpion being slammed into a tree.
Processing in Photoshop got started with a Lab Color treatment, then a series of radial blurs centered on Scorpion to draw the eye in and create the illusion of motion. If fight scenes weren't so difficult to pull off, I'd be tempted to do this all the time.
Sub Zero wins...EXIFity:
| Camera: | Canon EOS Digital Rebel XTi |
| Exposure: | 0.008 sec (1/125) |
| Aperture: | f/9 |
| Focal Length: | 24 mm |
| ISO Speed: | 400 |
| Exposure Bias: | 0/3 EV |
| Flash: | Flash did not fire |
| Orientation: | Horizontal (normal) |
| X-Resolution: | 72 dpi |
| Y-Resolution: | 72 dpi |
| Software: | Adobe Photoshop 7.0 |
| Date and Time: | 2008:12:06 13:21:59 |
| YCbCr Positioning: | Co-Sited |
| Exposure Program: | Aperture priority |
| Date and Time (Original): | 2008:12:03 12:50:42 |
| Date and Time (Digitized): | 2008:12:03 12:50:42 |
| Shutter Speed: | 456510/65536 |
| Metering Mode: | Pattern |
| Color Space: | Uncalibrated |
| Focal Plane X-Resolution: | 4433.295 dpi |
| Focal Plane Y-Resolution: | 4453.608 dpi |
| Compression: | JPEG |
| Image Width: | 2592 pixels |
| Image Height: | 3888 pixels |
Be good,
-Dave
|


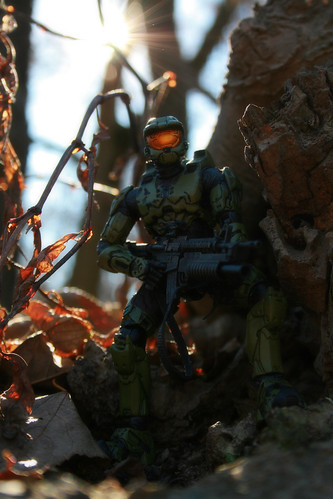
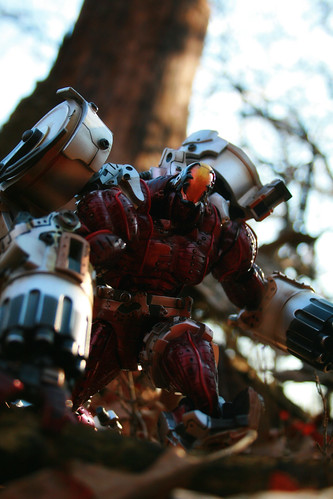
Today we have the follow up to the previous Master Chief shot. Again taken in the wonderful forest preserve, this time Master Chief found himself surrounded by fall vegetation. I like this one a little more because it seems to be telling more of a story than the previous shot. The colors are a little more vibrant, the figure seems to be in motion, and I always love catching the sun rays like that.
Cleanup in Photoshop consisted of the Lab Color adjustment, tweak the levels a bit to brighten the whole thing up, and adding a gaussian blur for that in-game bloom effect.
Since this is just a follow up to the previous post, I think I'm all done with this one! Woo hoo!
I love the smell of EXIF in the morning:
| Camera: | Canon EOS Digital Rebel XTi |
| Exposure: | 0.004 sec (1/250) |
| Aperture: | f/5.6 |
| Focal Length: | 39 mm |
| ISO Speed: | 400 |
| Exposure Bias: | 0/3 EV |
| Flash: | Flash did not fire |
| Orientation: | Horizontal (normal) |
| X-Resolution: | 72 dpi |
| Y-Resolution: | 72 dpi |
| Software: | Adobe Photoshop 7.0 |
| Date and Time: | 2008:12:01 12:54:00 |
| YCbCr Positioning: | Co-Sited |
| Exposure Program: | Aperture priority |
| Date and Time (Original): | 2008:11:28 13:24:13 |
| Date and Time (Digitized): | 2008:11:28 13:24:13 |
| Shutter Speed: | 522046/65536 |
| Metering Mode: | Pattern |
| Color Space: | Uncalibrated |
| Focal Plane X-Resolution: | 4433.295 dpi |
| Focal Plane Y-Resolution: | 4453.608 dpi |
| Compression: | JPEG |
| Image Width: | 2592 pixels |
| Image Height: | 3888 pixels |
Be good,
-Dave
|


5:08 AM by
El Dave
, under
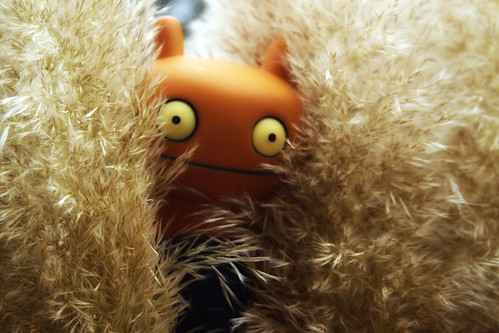
One thing I will say about Wage, he is a fancy pants. He only drinks (what he thinks is) the finest sparkling water, eats imported food (imported from the grocery store), and wears a silken (aka cotton) apron. So it comes as no surprise that, while visiting the Chicago Botanic Garden, he should enjoy these fluffy plants so much. He thinks they're where feather boas come from, and, as much as I tried to explain otherwise, he could not be persuaded. Fancy McWagepants, indeed.
This one was taken, as I said, at the Chicago Botanic Garden, nestled between the feathery seedpods of a prairie plant I can't remember.
Cleanup in Photoshop was about as simple as it gets. Throw a gaussian blur over the whole thing for the soft edges, tweak the saturation a little bit, then flatten and Save As.
Sorry for the light update today, but I feel terrible, it's too early, and I'm going back to bed.
Fancy McEXIFpants, indeed:
| Camera: | Canon EOS Digital Rebel XTi |
| Exposure: | 0.005 sec (1/200) |
| Aperture: | f/5.6 |
| Focal Length: | 55 mm |
| ISO Speed: | 400 |
| Exposure Bias: | 0/3 EV |
| Flash: | Flash did not fire |
| Orientation: | Horizontal (normal) |
| X-Resolution: | 72 dpi |
| Y-Resolution: | 72 dpi |
| Software: | Adobe Photoshop CS3 Windows |
| Date and Time: | 2008:11:17 14:06:54 |
| YCbCr Positioning: | Co-Sited |
| Exposure Program: | Aperture priority |
| Date and Time (Original): | 2008:11:02 14:51:07 |
| Date and Time (Digitized): | 2008:11:02 14:51:07 |
| Shutter Speed: | 500948/65536 |
| Metering Mode: | Pattern |
| Color Space: | sRGB |
| Focal Plane X-Resolution: | 4433.295 dpi |
| Focal Plane Y-Resolution: | 4453.608 dpi |
| White Balance: | Manual |
| Compression: | JPEG |
| Image Width: | 3888 pixels |
| Image Height: | 2592 pixels |
Be good,
-Dave
|


I've had a few people ask how I do the eye glow on my robots, so I thought it would be fun to do a tutorial and share it with you guys. For this we're gonna need 2 things, a picture of a robot and Photoshop. Wall-E? Check. Photoshop? Check.
(click on the pictures to see a larger version)
Step 1) Open your photo and make any Levels or Curves tweaks you need. I left both of those alone for this one.
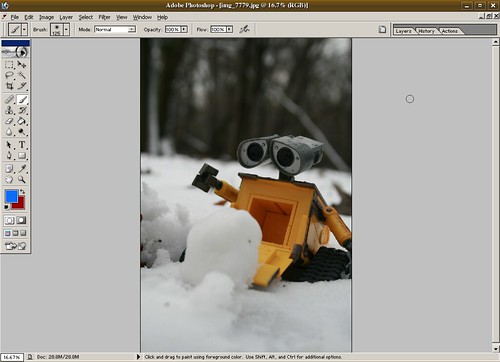
Step 2) OPTIONAL Apply the Lab Coloring that I talked about here. I set the second layer to Soft Light and changed the Opacity to 30%. Because I'm using it so much, I've recorded the Lab Coloring as an Action, so all I have to do is Open the image, click on Actions, then push Play. Like I said, this step is completely optional, but I want to show my work (wouldn't my algebra teachers be proud...).
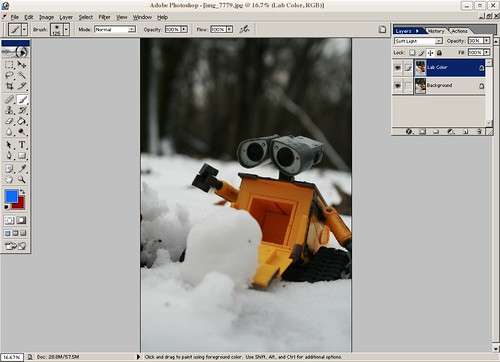
Step 3) Create a new Layer between the two existing Layers and call it Eye Glow. Select a soft edged paint brush and decide what color you want the eyes to be.
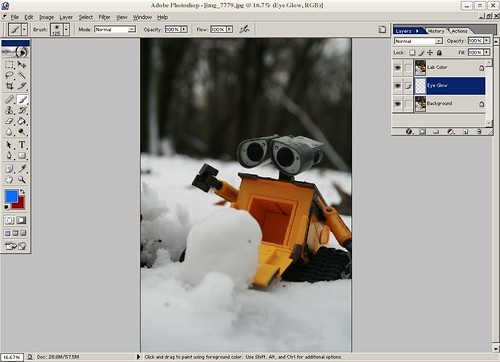
Step 4) Pick two shades of whatever color you chose for the eyes. Since Wall-E has blue eyes, I picked a dark blue and a brighter, almost turquoise. Paint the dark color first, using a brush just smaller than the area you're trying to fill.
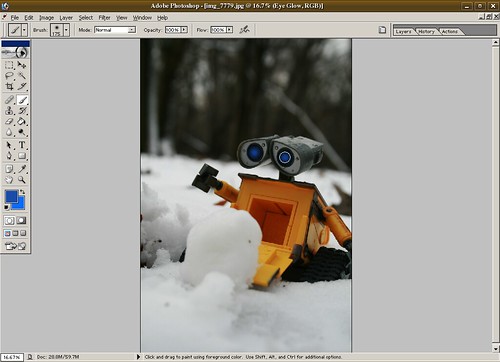
Step 5) Switch to your highlight color and shrink your brush (using the [ key) two or three times, depending on how intense you want the color to be. The smaller the brush, the brighter. Dot your eyes.
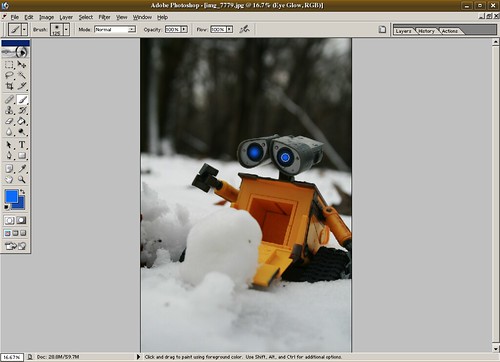
Step 6) Now we add depth. Using our Lab Color layer, we create a layer mask and, with a soft edge brush just smaller than we used for the dark part of the eye, dot the mask where the eye glow is. What this will do is cut a hole through the Lab Color layer, allowing the glow to shine through and create the illusion of depth, because the Eye Glow is behind the top layer.
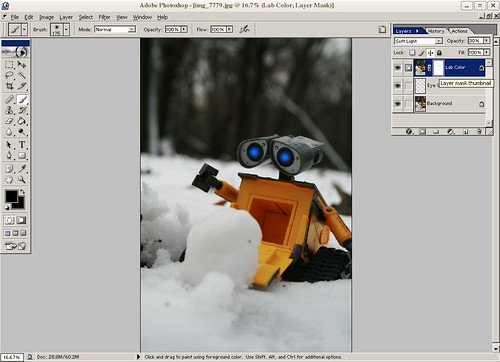
If you didn't create a Lab Color layer, have no fear. Simply duplicate your Background Layer and use it in the place of the Lab Color. When you're all finished, just flatten the image, do a quick Save As, and there you go! One quick and simple robot with glowing eyes.
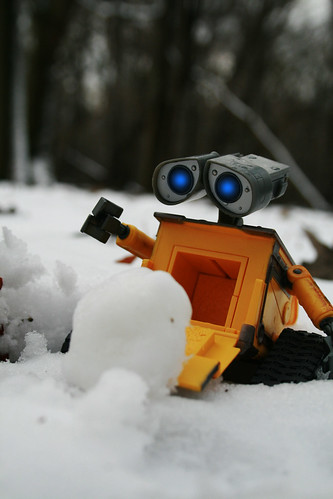
What do you think, Wall-E?
"Whoa"
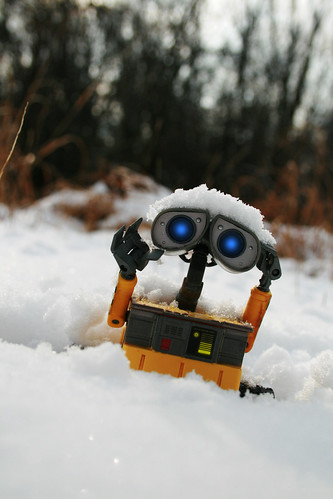
Waste Allocation Load Lifter-EXIF Class
| Camera: | Canon EOS Digital Rebel XTi |
| Exposure: | 0.001 sec (1/800) |
| Aperture: | f/5.6 |
| Focal Length: | 35 mm |
| ISO Speed: | 400 |
| Exposure Bias: | 0/3 EV |
| Flash: | Flash did not fire |
| Orientation: | Horizontal (normal) |
| X-Resolution: | 72 dpi |
| Y-Resolution: | 72 dpi |
| Software: | Adobe Photoshop 7.0 |
| Date and Time: | 2008:12:03 12:38:45 |
| YCbCr Positioning: | Co-Sited |
| Exposure Program: | Aperture priority |
| Date and Time (Original): | 2008:12:03 12:43:05 |
| Date and Time (Digitized): | 2008:12:03 12:43:05 |
| Shutter Speed: | 632020/65536 |
| Metering Mode: | Pattern |
| Color Space: | Uncalibrated |
| Focal Plane X-Resolution: | 4433.295 dpi |
| Focal Plane Y-Resolution: | 4453.608 dpi |
| Compression: | JPEG |
| Image Width: | 2592 pixels |
| Image Height: | 3888 pixels |
Be good,
-Dave
|


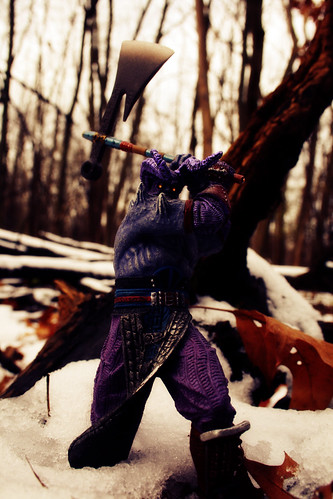
Astaroth is one of those characters that, if you can win with him, you can win with anyone. He's just this big, slow tank with a huge axe. Quick characters will walk circles around him, duck under his wide swings, and pretty much devastate him. Heck, in the demo video for Soulcalibur 2, Maxi runs up the axe handle and kicks Astaroth in his face! But once you learn his moves, you become unstoppable. You discover his quick strikes that keep your opponent off-balance, and you start swinging for the fences while they stagger back. Before long, your friends won't play you any more.
Sorry friends that won't play me any more. It's not my fault you don't know when to block!
This particular Astaroth figure was produced by McFarlane Toys. The deal seemed to be, in exchange for putting Spawn and the McFarlane-designed Necrid in SoulCalibur, McFarlane Toys would release a line of figures based on the game characters. Unfortunately they only released the first set of toys, which included, strangely enough, with both Spawn and Necrid in the lineup. Would have liked a Kilik and Mitsurugi instead, but I'll take what I can get.
Astaroth's Bio, courtesy of Wikipedia:
Introduced in Soulcalibur, Astaroth was created by a cult of Ares led by the priest Kunpaetku to retrieve the cursed sword Soul Edge by their god's command. Upon finding the blade Astaroth realized it was incomplete, and allied himself with its host Nightmare and his minions to harvest living souls necessary to restore the blade. Planning to steal the blade once it was restored, Astaroth was instead confronted by a survivor of one of his attacks and slain. Ares later revived Astaroth, who now had fragments of Soul Edge inside him, to continue after the Soul Edge. Kunpaetku realized his golem was not behaving as instructed, and placed a controlling curse on him. Astaroth resisted and attacked the cult, but in the chaos Kunpaetku escaped and Astaroth learned he was modeled after a human being, the "White Giant". Finding and nearly killing the man, Astaroth broke free of Ares's control and his body cracked and physcially transformed. Merged with the fragments of Soul Edge within him, he now hungered for souls himself and went on a rampage. He was eventually found by Tira, who offered him more power in return for his servitude to Nightmare. Astaroth accepted, with plans to eventually consume their souls and Soul Edge itself when the time was right.
Processing in Photoshop was surprisingly simple. Boost the saturation with Lab Color and add the eye glow on a new layer. Then use a gaussian blur set to Soft Light for the shadow and "bloom", and, as a final touch to bring it all together, create a purple/orange Gradient Map set to Soft Light to bring it all together.
Round 1, EXIF!
| Camera: | Canon EOS Digital Rebel XTi |
| Exposure: | 0.008 sec (1/125) |
| Aperture: | f/9 |
| Focal Length: | 24 mm |
| ISO Speed: | 400 |
| Exposure Bias: | 0/3 EV |
| Flash: | Flash did not fire |
| Orientation: | Horizontal (normal) |
| X-Resolution: | 72 dpi |
| Y-Resolution: | 72 dpi |
| Software: | Adobe Photoshop 7.0 |
| Date and Time: | 2008:12:03 17:41:56 |
| YCbCr Positioning: | Co-Sited |
| Exposure Program: | Aperture priority |
| Date and Time (Original): | 2008:12:03 12:49:30 |
| Date and Time (Digitized): | 2008:12:03 12:49:30 |
| Shutter Speed: | 456510/65536 |
| Metering Mode: | Pattern |
| Color Space: | Uncalibrated |
| Focal Plane X-Resolution: | 4433.295 dpi |
| Focal Plane Y-Resolution: | 4453.608 dpi |
| Compression: | JPEG |
| Image Width: | 2592 pixels |
| Image Height: | 3888 pixels |
Be good,
-Dave
|


8:02 AM by
El Dave
, under
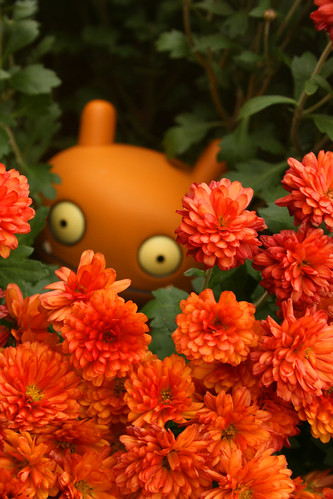
...aaaaand it's snowing. So much for the autumn colors and the days I could go out in just a jacket. While I'm sure Wage doesn't mind shoveling snow (note to self: buy tiny snow shovel), my poor fingers can't handle the cold. The rest of me is fine, but my hands? Forget about it!
We're thinking warm thoughts today here in Chicago and I wanted to share an equally warm picture with you guys. Taking Wage to the Chicago Botanic Garden is always an adventure. Sometimes people recognize him (and our other uglydolls) and other times people stop me and demand to know what I'm doing, which is always kind of awkward. Especially when I'm arguing with the toy for not standing or not being poseable enough for the shot I want.
Today's Plastic 52 was taken, as I said before, in the Chicago Botanic Garden with natural light. We were in the Enabling Garden (which is probably my favorite section, but don't tell the others) and I noticed this Wage-sized gap in the bush. I quickly scooped Wage out of my bag, placed him in the gap and snapped like mad.
Cleanup in Photoshop was just a quick Auto Levels and a bump in Saturation. Nothing fancy!
Why do I hear the Jaws theme when I look at this?
Assume your EXIF honestly,
| Camera: | Canon EOS Digital Rebel XTi |
| Exposure: | 0.033 sec (1/30) |
| Aperture: | f/9 |
| Focal Length: | 49 mm |
| ISO Speed: | 400 |
| Exposure Bias: | 0/3 EV |
| Flash: | Flash did not fire |
| Orientation: | Horizontal (normal) |
| X-Resolution: | 72 dpi |
| Y-Resolution: | 72 dpi |
| Software: | Adobe Photoshop CS3 Windows |
| Date and Time: | 2008:11:17 14:04:15 |
| YCbCr Positioning: | Co-Sited |
| Exposure Program: | Aperture priority |
| Date and Time (Original): | 2008:11:02 14:32:33 |
| Date and Time (Digitized): | 2008:11:02 14:32:33 |
| Shutter Speed: | 321578/65536 |
| Metering Mode: | Pattern |
| Color Space: | sRGB |
| Focal Plane X-Resolution: | 4433.295 dpi |
| Focal Plane Y-Resolution: | 4453.608 dpi |
| White Balance: | Manual |
| Compression: | JPEG |
| Image Width: | 2592 pixels |
| Image Height: | 3888 pixels |
Be good,
-Dave
|


10:32 AM by
El Dave
, under
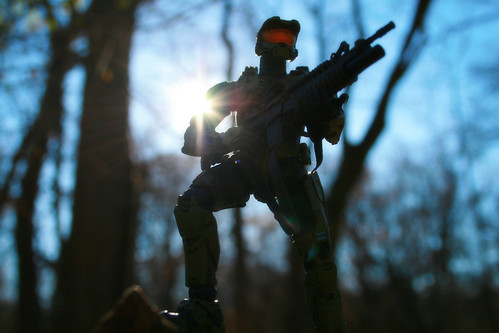
Good lord, do I suck at Halo. Sure, I do ok on the single player modes where the bad guys follow their little pre-programmed paths and I can pick them off with the sniper rifle, but as soon as I'm up against another player it's all over. In fact, I'm so terrible, I won't blame it on the horrible motion sickness I get from first person shooters. But that's not why you're here, is it?
Master Chief's bio, courtesy of Wikipedia:
Master Chief Petty Officer John-117, commonly called the Master Chief, is a fictional character and the main protagonist of the Halo universe, created by Bungie Studios, and is a player character in the trilogy of science fiction first-person shooter video games Halo: Combat Evolved, Halo 2, and Halo 3. Outside of video games, the Master Chief appears in the novels Halo: The Fall of Reach, Halo: The Flood, Halo: First Strike, and Halo: Uprising, and has cameos in Halo: Ghosts of Onyx and the Halo Graphic Novel. He is voiced by Chicago disc jockey Steve Downes in the video games in which he appears.
The Master Chief is one of the most visible symbols of the Halo series and the video game universe. Originally designed by Marcus Lehto, Rob McLees, and Shi Kai Wang, the character is a towering and faceless cybernetically enhanced supersoldier; he is never seen without his green-colored armor or helmet. Steve Downes built his personification of the Chief off a character description which called for a Clint Eastwood-type character of few words.
The Master Chief has been called an icon, a relative newcomer among more established franchise characters, such as Mario, Sonic the Hedgehog, and Lara Croft. While a widely known figure, the Master Chief has received mixed reception. Reviewers such as Kotaku have pointed to the Chief's silent and faceless nature as a weakness to the character, while other publications have stated that this attribute allows players to better assume the role of the Master Chief.
For today's shot, I actually have two pictures of the Chief. While going through my photos, my lovely assistant remarked how much she really liked this one. It seemed more cinematic, like the end credits of a movie. I disagreed and felt that it was too dark, but she's usually right about this sort of thing, so I put my pick on hold and will post about it later on.
Taking Master Chief out to the forest preserve, I found several fallen trees that made for really great stands/scenes. I posed Chief on a craggly stump, turned him around where the sun would be spilling over his shoulder and snapped the shot. In case you were wondering, I grabbed that gun from another McFarlane figure, one of their Military line. It's a little big for him, but not so large that it looks out of place.
Taking him into Photoshop, I tried a neat trick, courtesy of Digital Photography School. It involves tweaking the Lab Colors instead of the usual RGB or CMYK palattes. I like this look a LOT more than just tweaking the saturation levels and will definitely be using it going forward for anything that's a little washed out or just blah looking. After that, I added the usual gaussian blurs to soften the edges and viola! Done!
Elite soldier of the EXIF Corps
| Camera: | Canon EOS Digital Rebel XTi |
| Exposure: | 0.001 sec (1/1250) |
| Aperture: | f/5.6 |
| Focal Length: | 27 mm |
| ISO Speed: | 400 |
| Exposure Bias: | 0/3 EV |
| Flash: | Flash did not fire |
| Orientation: | Horizontal (normal) |
| X-Resolution: | 72 dpi |
| Y-Resolution: | 72 dpi |
| Software: | Adobe Photoshop 7.0 |
| Date and Time: | 2008:12:01 12:50:14 |
| YCbCr Positioning: | Co-Sited |
| Exposure Program: | Aperture priority |
| Date and Time (Original): | 2008:11:28 13:22:07 |
| Date and Time (Digitized): | 2008:11:28 13:22:07 |
| Shutter Speed: | 674216/65536 |
| Metering Mode: | Pattern |
| Color Space: | Uncalibrated |
| Focal Plane X-Resolution: | 4433.295 dpi |
| Focal Plane Y-Resolution: | 4453.608 dpi |
| Compression: | JPEG |
| Image Width: | 3888 pixels |
| Image Height: | 2592 pixels |
Be good,
-Dave
|


